You are here: Failback > Failback for data workloads > Restoring then failing back

Restoring then failing back

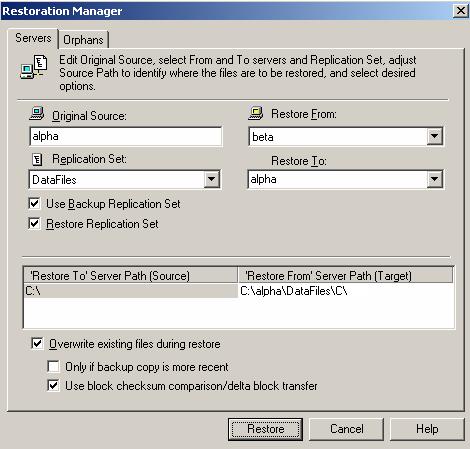
Restoring before failing back allows your users to continue accessing their data on the failed over target, which is standing in for the source, while you perform the restoration process. The key to this process is to keep the users off of the source, but allow the source and target to communicate to perform the restoration.

  1. Locate the file connect.sts on the source where you installed Double-Take Availability and rename it to connect.sts.old. This will keep the original connection from reconnecting when you bring the source online.
  2. Resolve the problem(s) on the source that caused it to fail. Make sure in resolving the problems, that you do not bring the source on the network at this time because the target currently has the source’s identity because of failover.
  3. Disable all of the NICs on the source.
  4. Change one of the NICs on the source to a unique IP address that the target can access.
  5. Configure that IP address so that it does not automatically register with DNS. This option is on the Advanced TCP/IP Settings dialog box on the DNS tab.
  6. Do not enable the modified NIC yet. If you do, you will receive a network name conflict, because the target has the source’s identity because of failover. There are many variations for dealing with a name conflict, here are a few examples.
  1. Stop any applications that may be running on your source. The files must be closed on the source so that updated files from the target will overwrite the files on the source.
  2. At this point, confirm you have the following configuration.
  1. From your target, confirm the Replication Console is communicating with the source using the new IP address.
  1. From the Replication Console on the target, right-click the source and select Remove.
  2. Depending on your configuration, the source may be automatically inserted back into the Replication Console. If it is not, select Insert, Server. Specify the source server and click OK.
  1. Begin your restoration process.
  1. From the Replication Console, select Tools, Restoration Manager.

  1. Identify the Original Source machine. This is your source machine where the data originally resided.
  2. Select the Restore From machine. This is the target machine where the copy of the data is stored.
  3. Note: If your target is a cluster, you can specify just one node in the cluster and restore only from that node. If you need to have the cluster functionality (Microsoft failover from node to node) available during the restoration process, you will have to create a resource, like you did for your original connection, for the restoration process. See Protecting a standard cluster. Keep in mind when restoring, your target will function as your source, sending data to the target, which will be your original or new source.
  4. Replication Set contains the replication set information stored on the target machine (the machine in Restore From). If no replication sets are available, the list will be blank. Select the replication set that corresponds to the data that you need to restore.
  5. Select the Restore To machine. This is your temporary source that has the unique IP address.
  6. The Restore To and Restore From paths will automatically be populated when the replication set is selected. The restore to path is the directory that is the common parent directory for all of the directories in the replication set. If the replication set crosses volumes, then there will be a separate path for each volume. The restore from path is the path on the target server where the replicated files are located.
  7. Note:

    Restoring across a NAT router requires the ports to be the same as the original connection. If the ports have been modified (manually or reinstalled), you must set the port numbers to the same values as the last valid source/target connection.

  1. Select the Use Backup Replication Set check box to use the target’s copy of the replication set database for the restoration. If this check box is not marked, you will be accessing the replication set information from the source.
  2. Select the Restore Replication Set check box to restore the target’s copy of the replication set database to the source during the restoration process.
  3. Select the restoration conditionals that you want to use.
  1. If you want to configure orphan files, click the Orphans tab. The same orphan options are available for a restoration connection as a standard connection.
  2. If your original source was using Replicate NT Security by Name, you must enable that option on the target before you start the restoration. The option is available on the target’s Server Properties on the Source tab.
  3. Click Restore to begin the restoration. You can identify a restoration connection because it is enclosed in parenthesis ( ) and it has _Restore appended to the end of the replication set name. The initial restoration is complete when the Mirror Status is Idle. After the Mirror Status is Idle, the connection will continue replicating any on-going data changes from the target to the source.
  1. After the Mirror Status is Idle, schedule a time for failback. User downtime will begin once failback is started, so select a time that will have minimal disruption on your users.
  2. When you are ready, begin the failback process.
  1. Open the Failover Control Center.
  2. Select the target that is currently standing in for the failed source.
  3. Select the failed source and click Failback. The user downtime starts now. If you have a pre-failback script configured, it will be started.
  4. Note: If the target is a cluster, you will need to determine the active node and failback from that node. Then you will need to failback from each of the other nodes to synchronize all of the nodes of the cluster.
  5. When failback is complete, the post-failback script, if configured, will be started. When the script is complete, you will be prompted to determine if you want to continue monitoring the source, do not select either option. Leave the prompt dialog box open as is.
  1. Back in the Replication Console, watch the restoration connection until activity has ended and replication is in a Ready state. This will happen as the final data in queue, if any, is applied on the source. The replication Ready state indicates replication is waiting for new incoming data changes. There will not be any additional data changes because failback has released the source identity, so users are no longer accessing their data.
  2. Once replication is in a Ready state, disconnect the restoration connection from the target. This is the connection enclosed in parenthesis () and it has _Restore appended to the end of the replication set name.
  3. Note:

    If your target is a cluster, take the Double-Take Source Connection resource offline to disconnect the connection.

    During the restoration, only the data is restored back to the source. Shares are not created on the source during the restoration. Shares that were created on the target during failover will need to be created manually on the source.

  1. On the source, change the IP address that you modified earlier to the unique address back to its original address. You can also enable any other NICs on the source.
  2. Also on the source, change the source name back to its original name and reboot, or restart the Workstation, Server, and any other services you were prompted to stop.
  3. Once the source is back online, users can reconnect to the source.
  4. Confirm the Replication Console is communicating with the source using the original IP address.
  1. Right-click the source and select Remove.
  2. Depending on your configuration, the source may be automatically inserted back into the Replication Console. If it is not, select Insert, Server. Specify the source server and click OK.
  1. At this time, you can go back to the dialog box in the Failover Control Center. Select Continue or Stop to indicate if you want to continue monitoring the source. After you have selected whether or not to continue monitoring the source, the source post-failback script, if configured, will be started.
  2. Note:

    The source must be online and Double-Take Availability must be running to ensure that the source post-failback script can be started. If the source has not completed its boot process, the command to start the script may be lost and the script will not be initiated.

  1. You can now reconnect your original replication set on the source to your target, to reestablish protection.

Related Topics