Open topic with navigation
Installing Double-Take Availability on Windows or Linux using the Double-Take Console
You can use the Double-Take Console to install or upgrade Double-Take Availability on your other servers. The installation is a full, client and server installation on Windows servers. The installation is a full server installation on Linux servers.
If you are upgrading from Double-Take RecoverNow, you should manually remove it and any TimeData and OnTrack PowerControls components before upgrading. The uninstall may be time consuming while it removes the associated SQL instance and deletes the continuous data protection storage bins. Additionally, the TimeData uninstall may require a reboot. Make sure that you recall and restore any Double-Take archived or deduplicated files before you uninstall Double-Take RecoverNow. If you choose not to uninstall TimeData or Ontrack PowerControls, Double-Take RecoverNow will still be uninstalled, and these programs will no longer function after the upgrade. If you do not remove the products, you will have to manually remove them. See the support site for complete instructions on the manual removal process.
The push installation process will not work on cluster nodes.
If you are going to be creating a V to Hyper-V or V to ESX job (see Selecting a protection type for details on which job to create), the job creation process can automatically push the Double-Take installation out to the servers, if you have the Double-Take Availability Virtual Guest Edition license. After the job is created, you will have 14 days to activate the licenses. (See Activating a single Double-Take server or Activating multiple Double-Take servers. ) If you do not have a Double-Take Availability Virtual Guest Edition license, you will need to perform the installation outside of the job creation process.
For Linux servers, the push installation process uses a combination of SSH (secure shell) and SCP (secure copy) to copy the installation binary files and execute them. SCP is not installed by default on certain configurations of version 6.x of Red Hat Enterprise Linux, Oracle Enterprise Linux, and CentOS. You will need to install it manually to use the push installation process. See your Linux documentation for installation details. See Full server to ESX appliance requirements for complete requirement details.
Also for Linux servers, you can only push the installation process. You cannot push an upgrade.
- Add the servers where you want to install Double-Take to your console session. See Adding servers.
- From the Manage Servers page, highlight all of the servers where you want to install Double-Take, and select Install from the toolbar.
- Each server needs an activation code for the installation. If you are upgrading and your server already has an activation code that is valid for the current version, you can either skip this step to use the existing activation code or you can complete this step to replace the existing activation code.
- If you have a single activation code that can be used on multiple servers, such as a site license or an evaluation code, highlight all of the servers where you want to apply the same activation code and click Set Activation codes. If you have unique activation codes for each of your servers, highlight just one server and click Set Activation codes.
- Type in your activation code or click Choose from inventory to open the Activation Codes dialog box where you can select the activation code you want to apply. For more information on the license inventory, see Managing the Double-Take license inventory.
- Click OK to configure the installation or upgrade for the selected activation code.
-
Repeat steps a-c for any additional servers that are using unique activation codes.
If you are pushing out a new activation code and it is a code that requires activation, you will have 14 days to activate the code. See License management and activation for more details on license activation.
-
The Default Installation Options section contains the default settings from the console's Options page. These settings will be applied to all of the servers you are installing to or upgrading. If desired, modify any of the installation options. See Console options.
Options you modify when using the push installation will be replaced by the default values from the Options page each time you use the push installation.
The Default Installation Options settings will vary depending on how you entered your source in your console session. If you are using a proxied source server, you will have fewer available options, and some of the options may be disregarded for Linux servers. See Adding servers for more details on proxied source servers.
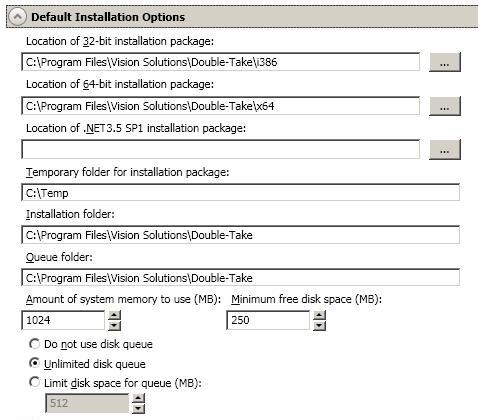
- Location of 32-bit installation package—Specify the location of the setup file (on the local machine) that will be used to install on 32-bit servers. By default, this is in the \i386 subdirectory where you installed Double-Take.
- Location of 64-bit installation package—Specify the location of the setup file (on the local machine) that will be used to install on 64-bit servers. By default, this is in the \x64 subdirectory where you installed Double-Take.
- Location of .NET 3.5 SP1 installation package—If your servers are running Windows 2008 or earlier and do not have Microsoft .NET version 3.5.1, specify the location of the setup file (on the local machine) that will be used to install it. The setup file is available on the Double-Take DVD in the \NetFx\v3.5SP1\Full directory or from the Microsoft web site. For 2008 R2 or later, you need to enable it through Windows features.
- Temporary folder for installation package—Specify a temporary location (on the server where you are installing Double-Take) where the installation files will be copied and run. You need approximately 130 MB of space in the specified location.
- Installation folder—Specify the location where you want to install Double-Take on each server.
- Queue folder—Specify the location where you want to store the Double-Take disk queue on each server.
- Amount of system memory to use—Specify the maximum amount of memory, in MB, that can be used for Double-Take processing. For complete details on memory usage, see Double-Take queue.
- Minimum free disk space—This is the minimum amount of disk space in the specified Queue folder that must be available at all times. This amount should be less than the amount of physical disk space minus the disk size specified for Limit disk space for queue.
- Do not use disk queue—This option will disable disk queuing. When system memory has been exhausted, Double-Take will automatically begin the auto-disconnect process.
- Unlimited disk queue—Double-Take will use an unlimited amount of disk space in the specified Queue folder for disk queuing, which will allow the queue usage to automatically expand whenever the available disk space expands. When the available disk space has been used, Double-Take will automatically begin the auto-disconnect process.
- Limit disk space for queue—This option will allow you to specify a fixed amount of disk space, in MB, in the specified Queue folder that can be used for Double-Take disk queuing. When the disk space limit is reached, Double-Take will automatically begin the auto-disconnect process.
-
Specify when you want to perform the installations under the Schedule section.
The Installation Schedule section will not be available if you are using a proxied source server. See Adding servers for more details on proxied source servers.
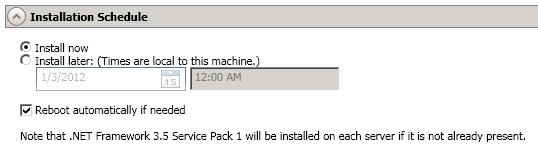
- Install now—Select this option to complete the installation immediately.
- Install later—Select this option and specify a date and time to complete the installation then.
- Reboot automatically if needed—If selected, the server will automatically reboot after the installation, if a reboot is required.
- After you have configured your installation options, click Install.
During an upgrade, any existing jobs on the Manage Jobs page may disappear and then reappear. This is expected while certain Double-Take files are updated.
If there are errors with the push installation before the installation is executed on the server, check the console log on the machine where you are pushing the installation from. Once the installation execution has started, then check the installation log on the server where you are installing.
Proxied servers will install Double-Take using the installation packages from the virtual recovery appliance rather than the installation packages from the Double-Take Console.
 Related Topics