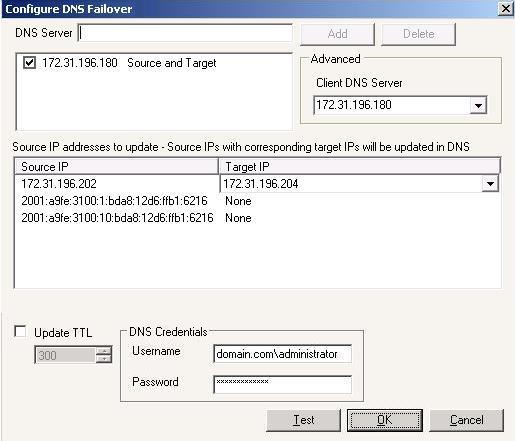
Application Manager will automatically determine default DNS failover settings. Use the following instructions to modify the DNS failover settings.
-
The DNS Server list contains all DNS IP addresses for the source and target servers. The label after the IP address indicates if the DNS IP address belongs to the source, target, or both. To add additional DNS servers to the list, enter an IP address into the DNS Server field and click Add. To remove an IP address from the list, highlight the address and click Delete.
If you want to set the primary DNS server that Double-Take Availability will use during failover, you can specify Client DNS Server. This option is only available if you have launch the Application Manager using the command line advanced option.

-
Under Source IP addresses to update, map a source IP address to a target IP address for DNS updates.
If you are protecting Exchange and one or more IP addresses are configured for the SMTP virtual server on the target, the first IP address will be the default target IP address for all source IP addresses.
-
You can specify the length of time, in seconds, that the source's DNS A records are cached in the Time to Live. Enable Update TTL and specify a number of seconds. Ideally, you should specify 300 seconds (5 minutes) or less.
In order to update the Time to Live, the machine where the Application Manager is running must be able to connect to the DNS server through WMI. If it cannot, the Time to Live record will not be updated and the Application Manager will return an error that the RPC server is unavailable.
- Specify DNS Credentials and specify a user that has privileges to access and modify DNS records. The user must be a member of the DNSAdmins gruop for the domain where the DNS server resides. You can enter a user for a different domain by entering a fully qualified name in the format domain\username or username@domain. If you enter a non-qualified name, the DNS domain from the DNS server will be used.
- Once your DNS failover settings are configured, click Test to validate your configuration. If you have any issues with your configuration, review the following DNS information.
- The DNS zone Dynamic updates should be set to Secure only. Otherwise, you must disable dynamic registration on the source server in order to prevent the source from reclaiming its DNS record.
- DNS reverse lookup should be enabled. For more information on enabling reverse lookup, see your Microsoft documentation.
- If you are running Windows Server 2000 on the primary DNS server and are hosting zones or domains that contain source and/or target records, you must have the DNS WMI Provider installed on that DNS server.
- If a hosts file entry for the source server exists on end-user machines, errors may occur during a failover and failback.
- If you have a NIC designated only for Double-Take Availability traffic, DNS registration for that NIC should be disabled.
- If you are protecting Exchange and your server is using a public IP address to receive e-mail, you will have to change the public advertised DNS MX record to reflect the target IP address. Consult your service provider for instructions.
- If you are protecting Exchange and you want to allow external e-mail to be delivered to the target server when the source is unavailable, you should create an additional external MX record for the target server. The target MX record should have a lower priority than the source. Refer to your router or firewall documentation for more information.
- In a cluster environment with more than one NIC on a server/node, if the heartbeat network IP address is at the top of the binding order, a socket error will occur when you attempt to select or configure the server. To avoid this issue, change the binding order on all source and target servers/nodes so the domain IP address is at the top of the order. Each server must be rebooted for the change to take effect.
- Click OK to save your settings.


