You are here: Recovery > Recovering an entire server to an automatically provisioned virtual machine on Hyper-V
Recovering an entire server to an automatically provisioned virtual machine on Hyper-V
There are two ways to begin the recovery process.
Click Recover from the left navigation pane and identify the repository server that contains your source data that you want to recover. Click Next to continue.
Highlight the data protection job on the Monitor page and select Recover from the toolbar. This automatically identifies the repository server that contains the source data that you want to recover.
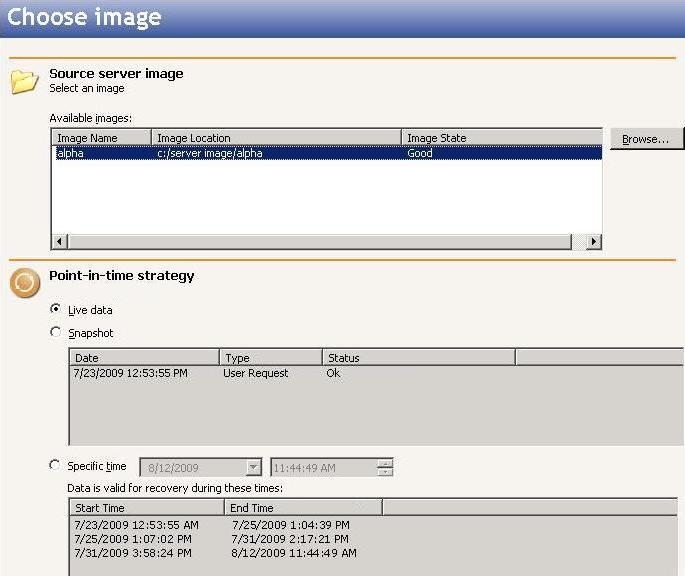
Select the image of the source that you want to recover and the point-in-time strategy.
Available images—Select the image of the source that contains the data you want to recover. If the image is not displayed, click Browse to look for the location of the server image.
Live data—Select this option to recover to the live data that is currently stored on the repository server.
Snapshot—Select this option and choose a snapshot from the list to recover to the data stored in that snapshot. If you did not enable snapshots or there were no snapshots taken on the repository server, there will be no snapshots in the list.
Specific time—Select this option and choose a specific date and time to recover the data from that point in time. The table below the date and time fields allows you to confirm that the Double-Take Backup data is valid for the point in time you are selecting. If you did not enable continuous data protection when you configured protection or if the TimeData initialization has not completed, this option will not be available.
Click Next to continue.
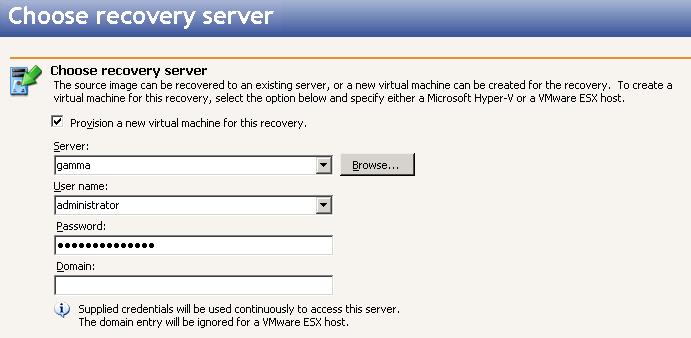
Select the recovery server. This is the Hyper-V server that will host the virtual machine that, after the recovery, will become your new source.
Provision a new virtual machine for this recovery—Enable this option to recover to an automatically provisioned virtual machine hosted on a Hyper-V server.
Server—Specify the name of the Hyper-V server. You can also click Browse to select the name from Active Directory or from a network drill-down list.
User name—Specify a user that is a member of the Double-Take Admin security group on the recovery server. If your original source was the only domain controller in your network, you must specify a local account in the local administrators group.
Password—Specify the password associated with the User name you entered.
Domain—If you are working in a domain environment, specify the Domain.
Click Next to continue.
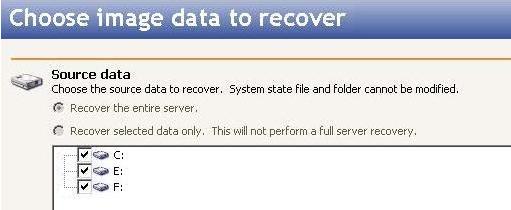
Because you are creating a new virtual machine, you must Recover the entire server so that the system state from the original source can be used to create the new virtual. You can exclude volumes that you protected but do not want to recover, but be careful when excluding data. Excluded volumes may compromise the integrity of your applications. Volumes marked with a checkmark are included. If there is no checkmark, the item is excluded.
Click Next to continue.
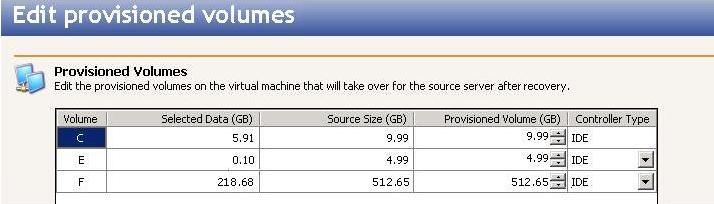
Specify the volumes to create on the new virtual machine.
Selected Data—This displays the amount of data, in gigabytes, currently on the source volume.
Source Size—This displays the size, in gigabytes, of the volume on the source.
Provisioned Volume—Specify the size, in gigabytes, of the volume to be created on the new virtual.
Controller Type—Specify the type of controller, IDE or SCSI, to be used for each volume. The boot volume must be an IDE controller.
Click Next to continue.
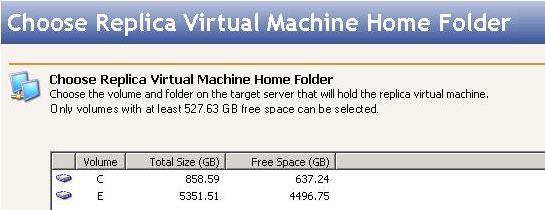
Specify the volume and, if desired a folder, on the target server where the new virtual machine will be created. You can only select a volume that has enough free space available.
Click Next to continue.
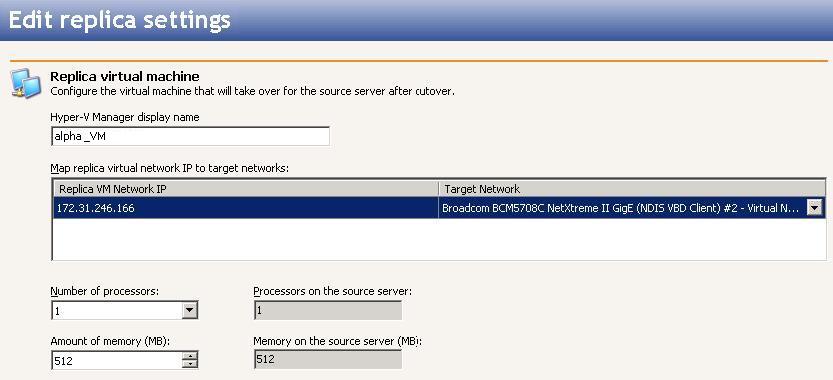
Configure the new virtual machine that will be created and will become the source after the recovery.
Hyper-V Manager display name—By default, source name_VM will be used to create the new virtual machine display name. If desired, you can modify the name.
Map replica virtual network IP to target networks—You will need to identify how you want to handle the network mapping. The Replica VM Network IP lists the IP addresses contained in the image of the original source. Map each one to a Target Network, which is a virtual network on the Hyper-V server.
Number of processors—Specify how many processors to configure on the virtual machine. The number of processors from the original source image is displayed.
Amount of memory—Specify the amount of memory to configure on the virtual machine. The amount of memory from the original source image is displayed.
Click Next to continue.
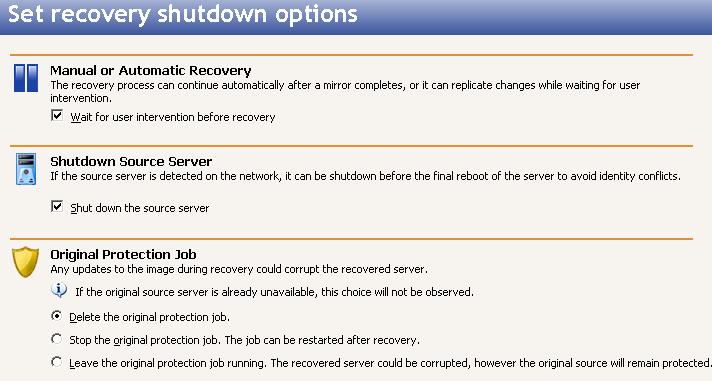
Specify your recovery shutdown options.
Wait for user intervention before recovery—Specify if you want to pause the recovery process after the original source image has been mirrored to the new virtual machine on the Hyper-V server, which allows you time to coordinate any other tasks. If you do not pause the recovery, the new virtual machine will be started immediately after the mirror is complete.
Shut down the source server—Specify if you want to shutdown the source server before the new virtual machine is started, which avoids identity conflicts on the network.
Original Protection Job—Specify what to do with the original protection job if the original source is still online. If the original source is not running, these options will be discarded because they cannot be performed.
Delete the original protection job—The original protection job is stopped and then deleted.
Stop the original protection job—The original protection job is stopped but is not deleted. It can be restarted after the recovery.
Leave the original protection job running—The original protection job is not stopped or deleted. Keep in mind with this option that the data on the recovery server could become inconsistent or corrupted because the original source protection job could be transmitting data to the repository server and that data might get transmitted to the recovery server, depending on the progress of the recovery process .
Click Next to continue.
At the Recovery summary page, you can review the choices you have made and you can also set optional data transmission and e-mail notification settings. If you need to make any changes to the selections you made, click Back to return to the previous pages. If you want to configure optional settings, click Configure. Once you have completed your configuration, click Finish to start the recovery.
Monitor the progress of the recovery mirror on the Monitor page.
When the recovery mirror has completed, the new virtual machine on the recovery server will automatically start to complete the recovery process. If you specified to pause the recovery, when the mirror is complete, the Activity will change to Protected. Use this time to complete any necessary tasks. When you are ready to complete the recovery, click Recover on the Monitor page toolbar to complete the recovery process. Once the virtual machine has been started, it will become the original source server.
Note
Because the Windows product activation is dependent on hardware, you may need to reactivate your Windows registration after recovery. Follow the on-screen prompts to complete the reactivation.
 Related Topics