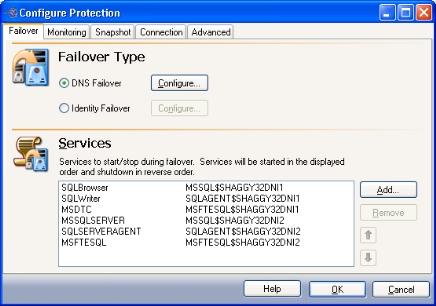
If you have not done so already, launch the Protecting a SQL Server workflow.
The Failover tab includes options that will be applied during SQL failover.
|
|
The following topics explain how to configure the options on the Failover tab:
Failover Type indicates what name resolution method will be used to redirect users to the target SQL server in the event of a source failure. By default, DNS Failover is selected.
|
Note: |
For clustered environments, only DNS failover is supported. |
DNS Failover is the recommended method for failover. Use this option if you want to failover by updating the DNS records associated with the source. This will modify all source server A, MX, and PTR-type DNS resource records to point to the target.
In DNS Failover, the DNS records for the source server are modified to point to the target server’s IP address. This allows clients to resolve the source SQL server name to the target server’s network name and IP address at failover time. DNS Failover eliminates duplicate server name and IP addresses on your network.
After you select the DNS Failover option, click Configure. The Configure DNS Failover window will appear.
|
|
Configure the following information for DNS failover:
|
Note: |
To remove an IP address from the DNS server list, select the IP address, then click the Delete button. |
|
Note: |
If the target is monitoring multiple source IP addresses for failover, each monitored source IP address must be mapped to a unique target IP address. |
|
Note: |
If the server that the Application Manager is running on has a problem connecting to the DNS server through WMI, the TTL record will not be updated. This will cause the Application Manager to return an error that the RPC server is unavailable. |
You may enter a user name for a different domain by entering a fully-qualified user name. The fully-qualified user name must be in the format domain\username or username@domain. If you enter a non-qualified name, the DNS domain will be used by default. The domain name is obtained from the DNS server name, provided that reverse lookup in DNS is enabled. For more information about enabling reverse lookup, refer to your Microsoft documentation.
Select this option if you want to failover by transferring the source IP address and name to the target. When using identity failover, it is possible that a name and/or IP address conflict can occur either during failover or when the original source server comes back online. To avoid this conflict, use DNS Failover.
|
Note: |
Identity failover is not supported in clustered environments. Application Manager cannot be used for failover or failback when the Identity failover method is selected. However, the Failover Control Center can still be used to initiate failover. DNS failover reduces downtime and provides other benefits. It is recommended for most environments. |
In Identity Failover, the target’s physical identity is modified to match the source during a failover. This includes the target adopting the source server’s name, primary IP address, and drive shares during a failover. Identity failover may be required in the following situations:
After you select the Identity Failover option, click Configure. The Configure Identity Failover window will appear.
|
|
Enter the following information for Identity failover:
|
Note: |
If your source and target servers are on different subnets, you should NOT failover the IP address. Instead, if the server name is required you should choose DNS failover with the Advanced switch and select the Server Name. For more information, see Advanced settings. |
Application Manager will determine the appropriate SQL services to start/stop based on your operating system/SQL configuration. You should only modify this selection if there are additional services that need to be started along with SQL during the failover/failback process.
Modifying the default configuration for services may affect whether data can be successfully replicated. Do not modify the services to start/stop unless you are very familiar with Double-Take Availability and SQL.
|
|
You can remove all of the services besides the required SQL server service (MSSQLSERVER for a default instance, or MSSQL$<instance_name> for a named instance).
Next step: Configure monitor settings
 Failover type