Open topic with navigation
Failing back using DNS
If you have not done so already, launch the Application Manager by selecting Start, Programs, Double-Take, Availability, Double-Take Availability Application Manager.
Based on the current protection status and/or failover state, the Failover/Failback button on the Monitor tab and menu options will be updated to display the available command. If the Application Manager is not in a state that will allow failover or failback to be executed, the Failover/Failback button and menu option will be grayed out (disabled).
During failover and failback, the status messages at the bottom of the screen describe the failover or failback progress.
|
Note:
|
- Protection Status and Monitoring Status on the Setup tab are not updated during failback.
- The refresh update rate is not automatically updated during failback.
- When using Application Manager for Exchange:
- If your SMTP gateway (or vendor) is configured to send mail to a specific IP address and that IP address is not failed over to the target, you will need to change it during failover.
- While in a failed over state, you cannot log in to the domain from the source Exchange server. This is because the target has assumed the source server's host Service Principal Names to allow Outlook Web Access to be accessed using the source name. If you need to log in to the domain and OWA is not needed, contact Double-Take Software Technical Support for a workaround.
- When using Application Manager for file servers, the failover button will only work after the source server is offline. This is necessary to prevent name conflicts on the network when the name is failed over.
|
Failback and restoration
After issues on the source server are resolved and it is connected and online, you can failback to the source and restore any modified data. In order to initiate failback, both the Protection Status and Failover/Monitoring Status must be Failed Over.
|
Note:
|
When using Application Manager for Exchange, any mail stores or storage groups that are created while the source is in a failover state will not failback properly.
|
If the source server has to be rebuilt, follow the instructions in Rebuilding the source.
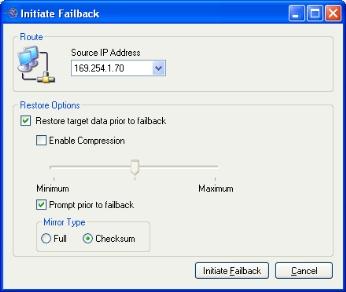
To initiate failback, click the Failback button, or select Actions, Failback. The Initiate Failback window will appear.
On the Initiate Failback window, select the following failback options:
- In the Source IP Address field, select the IP address the Double-Take Availability data will be transmitted through. You should only change this setting if you want to select a different route for Double-Take Availability traffic. On a machine with more than one NIC, this increases the flexibility of configuring Double-Take Availability activity. For example, you can separate regular network traffic and Double-Take Availability traffic on a machine. The default ports will be used.
In a cluster, the route should be set to the name of the Exchange virtual server (EVS) dependent IP address.
- Select Restore target data prior to failback if you want to restore any modified data from the target back to the source prior to beginning the failback.
- Select Enable Compression to enable compression of data that is transmitted from the target to the source. Then, set the level from minimum to maximum compression. The default level is inherited from the source-to-target connection.
- Select Prompt prior to failback if you want a prompt to appear before failing back.
- Depending on how long the server has been failed over or the amount of data changed, it may be more efficient to perform a full mirror upon restore. Specify what files you want sent from the target to the source during a mirror.
- Full—Copies all of the directories and files in the replication set to the target machine. If a mirror has already been completed, another full mirror will overwrite the data on the target.
- Checksum—(Default) This option performs a checksum comparison calculation. A checksum calculation is a formula applied to blocks of data to determine if the binary make-up of the block is identical. If the checksums on the source and target machine are the same, the block is skipped. If the checksums on the source and target machine are not the same, the block on the source is sent to the target. With this option, the entire file is not overwritten; only the block that is received from the source is overwritten.
- Click Initiate Failback to begin the failback process. The restoration will begin and the Protection Status will display the progress of the restoration. If you selected Prompt prior to failback, when the restoration is complete a prompt will appear asking if you want to failback. Click Yes to failback to the source.
During restoration, the Application Manager will display the percent complete. Although the Application Manager does not display restoration statistics, you can view the connection and current status statistics through the Double-Take Replication Console.
Next step: Re-enable protection
