

|
Use these instructions to edit a V to ESX job.
From the Manage Jobs page, highlight the job and click View Job Details in the toolbar.
In the Tasks area on the right on the View Job Details page, click Edit job properties.
Because you configured multiple jobs at once when you first established your protection, not all of the individual job options were available during job creation. Therefore, you will have additional job options when you edit an existing job.
Changing some options may require Double-Take to automatically disconnect, reconnect, and remirror the job.
There will be additional sections on the Edit Job Properties page that you will be able to view only. You cannot edit those sections.

For the Job name, specify a unique name for your job.
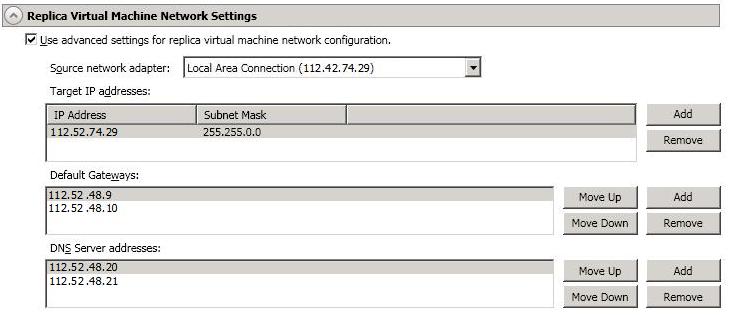
Source network adapter—Select a network adapter on the source and specify the Target IP addresses, Default Gateways, and DNS Server addresses to be used after failover. If you add multiple gateways or DNS servers, you can sort them by using the Move Up and Move Down buttons. Repeat this step for each network adapter on the source.
Updates made during failover will be based on the network adapter name when protection is established. If you change that name, you will need to delete the job and re-create it so the new name will be used during failover.
If you update one of the advanced settings (IP address, gateway, or DNS server), then you must update all of them. Otherwise, the remaining items will be left blank. If you do not specify any of the advanced settings, the replica virtual machine will be assigned the same network configuration as the source.
By default, the source IP address will be included in the target IP address list as the default address. If you do not want the source IP address to be the default address on the target after failover, remove that address from the Target IP address list.
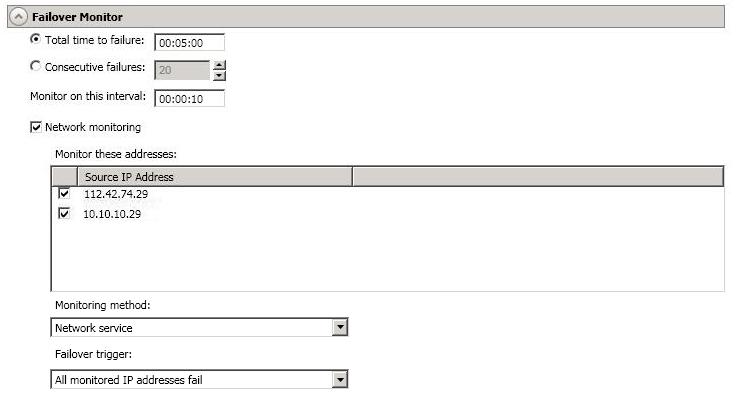
Total time to failure—Specify, in hours:minutes:seconds, how long the target will keep trying to contact the source before the source is considered failed. This time is precise. If the total time has expired without a successful response from the source, this will be considered a failure.
Consider a shorter amount of time for servers, such as a web server or order processing database, which must remain available and responsive at all times. Shorter times should be used where redundant interfaces and high-speed, reliable network links are available to prevent the false detection of failure. If the hardware does not support reliable communications, shorter times can lead to premature failover. Consider a longer amount of time for machines on slower networks or on a server that is not transaction critical. For example, failover would not be necessary in the case of a server restart.
Monitor on this interval—Specify, in hours:minutes:seconds, how long to wait between attempts to contact the source to confirm it is online. This means that after a response (success or failure) is received from the source, Double-Take will wait the specified interval time before contacting the source again. If you set the interval to 00:00:00, then a new check will be initiated immediately after the response is received.
If you choose Total time to failure, do not specify a longer interval than failure time or your server will be considered failed during the interval period.
If you choose Consecutive failures, your failure time is calculated by the length of time it takes your source to respond plus the interval time between each response, times the number of consecutive failures that can be allowed. That would be (response time + interval) * failure number. Keep in mind that timeouts from a failed check are included in the response time, so your failure time will not be precise.
Monitor these addresses—Select each Source IP Address that you want the target to monitor. If you want to monitor additional addresses, enter the address and click Add.

Wait for user to initiate failover—By default, the failover process will wait for you to initiate it, allowing you to control when failover occurs. When a failure occurs, the job will wait in Failover Condition Met for you to manually initiate the failover process. Disable this option only if you want failover to occur immediately when a failure occurs.
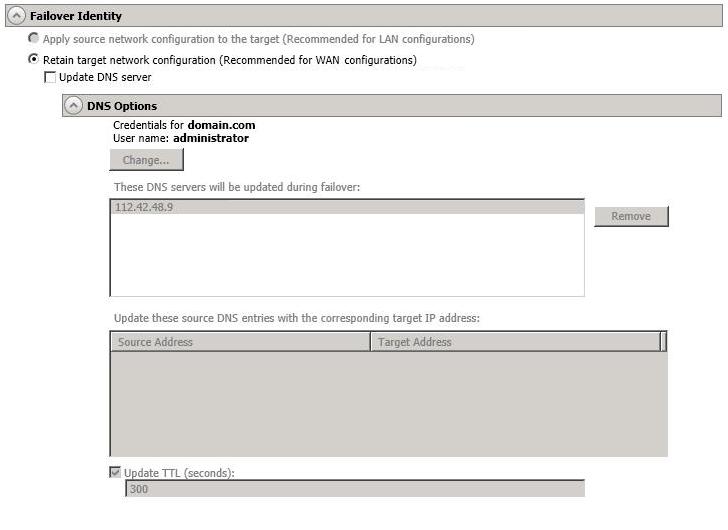
Update DNS server—Specify if you want Double-Take to update your DNS server on . If DNS updates are made, the DNS records will be locked during .
DNS updates are not available for source servers that are in a workgroup.
Expand the DNS Options section to configure how the updates will be made. The DNS information will be discovered and displayed. If your servers are in a workgroup, you must provide the DNS credentials before the DNS information can be discovered and displayed.
If you select Retain your target network configuration but do not enable Update DNS server, you will need to specify failover scripts that update your DNS server during failover, or you can update the DNS server manually after failover. This would also apply to non--Microsoft Active Directory Integrated DNS servers. You will want to keep your target network configuration but do not update DNS. In this case, you will need to specify failover scripts that update your DNS server during failover, or you can update the DNS server manually after failover.
DNS updates will be disabled if the target server cannot communicate with both the source and target DNS servers
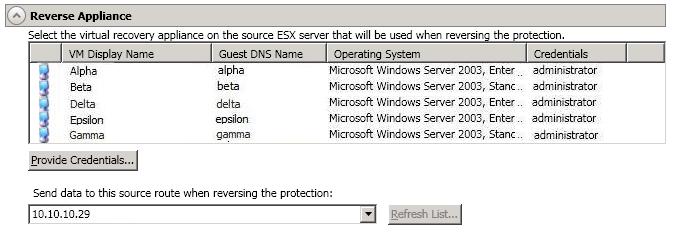
If you are using domain credentials during job creation, you must be able to resolve the domain name from the replica virtual machine using DNS before you can reverse.
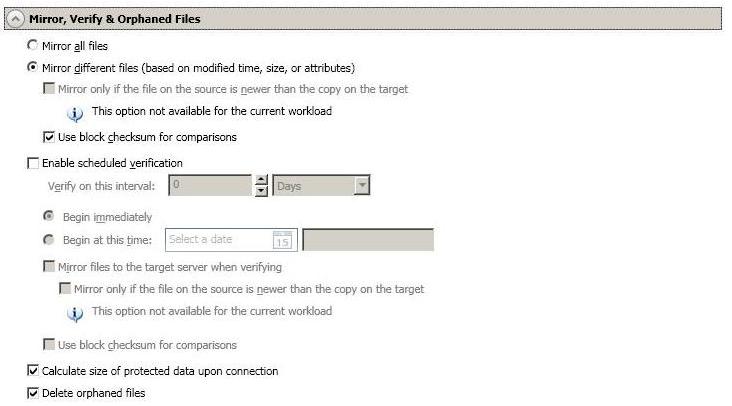
The following table will help you understand how the various difference mirror options work together, including when you are using the block checksum option configured through the Source server properties.
An X in the table indicates that option is enabled. An X enclosed in parentheses (X) indicates that the option can be on or off without impacting the action performed during the mirror.
Not all job types have the source newer option available.
| Source Server Properties | Job Properties | Action Performed | ||
|---|---|---|---|---|
| Block Checksum Option | File Differences Option | Source Newer Option | Block Checksum Option | |
| (X) | X | Any file that is different on the source and target based on the date, time, size, and/or attribute is transmitted to the target. The mirror sends the entire file. | ||
| (X) | X | X | Any file that is newer on the source than on the target based on date and/or time is transmitted to the target. The mirror sends the entire file. | |
| X | X | Any file that is different on the source and target based on date, time, size, and/or attributed is flagged as different. The mirror then performs a checksum comparison on the flagged files and only sends those blocks that are different. | ||
| X | X | X | The mirror performs a checksum comparison on all files and only sends those blocks that are different. | |
| (X) | X | X | X | Any file that is newer on the source than on the target based on date and/or time is flagged as different. The mirror then performs a checksum comparison on the flagged files and only sends those blocks that are different. |
Enable scheduled verification—Verification is the process of confirming that the source replica data on the target is identical to the original data on the source. Verification creates a log file detailing what was verified as well as which files are not synchronized. If the data is not the same, can automatically initiate a remirror, if configured. The remirror ensures data integrity between the source and target. When this option is enabled, Double-Take will verify the source replica data on the target and generate a verification log.
Because of the way the Windows Cache Manager handles memory, machines that are doing minimal or light processing may have file operations that remain in the cache until additional operations flush them out. This may make Double-Take files on the target appear as if they are not synchronized. When the Windows Cache Manager releases the operations in the cache on the source and target, the files will be updated on the target.
Calculate size of protected data before mirroring—Specify if you want Double-Take to determine the mirroring percentage calculation based on the amount of data being protected. If the calculation is enabled, it is completed before the job starts mirroring, which can take a significant amount of time depending on the number of files and system performance. If your job contains a large number of files, for example, 250,000 or more, you may want to disable the calculation so that data will start being mirrored sooner. Disabling calculation will result in the mirror status not showing the percentage complete or the number of bytes remaining to be mirrored.
The calculated amount of protected data may be slightly off if your data set contains compressed or sparse files.
Do not disable this option for V to ESX jobs. The calculation time is when the system state protection processes hard links. If you disable the calculation, the hard link processing will not occur and you may have problems after failover, especially if your source is Windows 2008.
Delete orphaned files—An orphaned file is a file that exists in the replica data on the target, but does not exist in the protected data on the source. This option specifies if orphaned files should be deleted on the target during a mirror, verification, or restoration.
Orphaned file configuration is a per target configuration. All jobs to the same target will have the same orphaned file configuration.
The orphaned file feature does not delete alternate data streams. To do this, use a full mirror, which will delete the additional streams when the file is re-created.
If delete orphaned files is enabled, carefully review any replication rules that use wildcard definitions. If you have specified wildcards to be excluded from protection, files matching those wildcards will also be excluded from orphaned file processing and will not be deleted from the target. However, if you have specified wildcards to be included in your protection, those files that fall outside the wildcard inclusion rule will be considered orphaned files and will be deleted from the target.
If you want to move orphaned files rather than delete them, you can configure this option along with the move deleted files feature to move your orphaned files to the specified deleted files directory. See Target server properties for more information.
During a mirror, orphaned file processing success messages will be logged to a separate orphaned file log. This keeps the Double-Take log from being overrun with orphaned file success processing messages. Orphaned files processing statistics and any errors in orphaned file processing will still be logged to the Double-Take log, and during difference mirrors, verifications, and restorations, all orphaned file processing messages are logged to the Double-Take log. The orphaned file log is located in the Logging folder specified for the source. See Log file properties for details on the location of that folder. The orphaned log file is overwritten during each orphaned file processing during a mirror, and the log file will be a maximum of 50 MB.

For Send data to the target server using this route, Double-Take will select, by default, a target route for transmissions. If desired, specify an alternate route on the target that the data will be transmitted through. This allows you to select a different route for Double-Take traffic. For example, you can separate regular network traffic and Double-Take traffic on a machine with multiple IP addresses.
The IP address used on the source will be determined through the Windows route table.

To help reduce the amount of bandwidth needed to transmit Double-Take data, compression allows you to compress data prior to transmitting it across the network. In a WAN environment this provides optimal use of your network resources. If compression is enabled, the data is compressed before it is transmitted from the source. When the target receives the compressed data, it decompresses it and then writes it to disk. You can set the level from Minimum to Maximum to suit your needs.
Keep in mind that the process of compressing data impacts processor usage on the source. If you notice an impact on performance while compression is enabled in your environment, either adjust to a lower level of compression, or leave compression disabled. Use the following guidelines to determine whether you should enable compression.
All jobs from a single source connected to the same IP address on a target will share the same compression configuration.
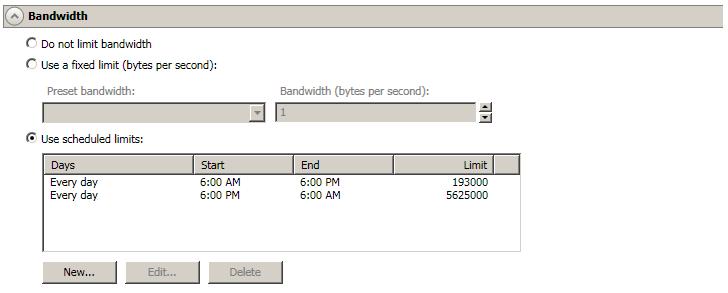
Bandwidth limitations are available to restrict the amount of network bandwidth used for Double-Take data transmissions. When a bandwidth limit is specified, Double-Take never exceeds that allotted amount. The bandwidth not in use by Double-Take is available for all other network traffic.
All jobs from a single source connected to the same IP address on a target will share the same bandwidth configuration.
If you change your job option from Use scheduled limits to Do not limit bandwidth or Use a fixed limit, any schedule that you created will be preserved. That schedule will be reused if you change your job option back to Use scheduled limits.
You can manually override a schedule after a job is established by selecting Other Job Options, Set Bandwidth. If you select No bandwidth limit or Fixed bandwidth limit, that manual override will be used until you go back to your schedule by selecting Other Job Options, Set Bandwidth, Scheduled bandwidth limit. For example, if your job is configured to use a daytime limit, you would be limited during the day, but not at night. But if you override that, your override setting will continue both day and night, until you go back to your schedule. See the Managing and controlling jobs section for your job type for more information on the Other Job Options.
Double-Take validates that your source and target are compatible. The Summary page displays your options and validation items.
Errors are designated by a white X inside a red circle. Warnings are designated by a black exclamation point (!) inside a yellow triangle. A successful validation is designated by a white checkmark inside a green circle. You can sort the list by the icon to see errors, warnings, or successful validations together. Click on any of the validation items to see details. You must correct any errors before you can enable protection.
Before a job is created, the results of the validation checks are logged to the Double-Take Management Service log on the target.
Once your servers have passed validation and you are ready to update your job, click Finish.
 General
 Related Topics