
|
|
Use the following instructions to set up your source protection.
Identify the source server that you want to protect.

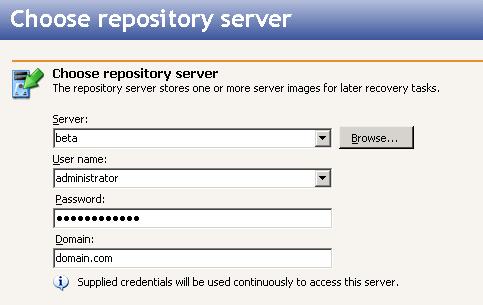
Identify the repository server that will store the source data or the image of the entire source.
Select what you want to protect on the source.
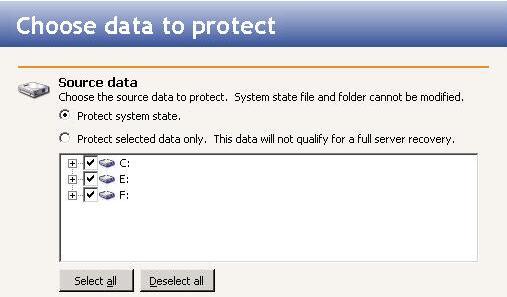
By default, Double-Take RecoverNow selects all applicable source files based on your system state or selected data only choice. By default for system state protection, some files are included and excluded depending on if they can be used during a recovery. For example, the boot volume cannot be excluded because that is where the system state information is stored. If desired, you can exclude other files that you do not want to protect, but be careful when excluding data. Excluded volumes, folders, and/or files may compromise the integrity of your applications.
Volumes, folders, and files that are marked with a checkmark are included. If there is no checkmark, the item is excluded. Expand and collapse the directory tree and click on an item to add or remove a checkmark.
The Select all and Deselect all buttons allow you to quickly select or deselect all data on your server based on your system state or selected data only choice. These buttons will do not change what is selected for the system state, which is defined by Double-Take RecoverNow and cannot be modified.
The application consistency feature is not supported for SQL Server 2000.
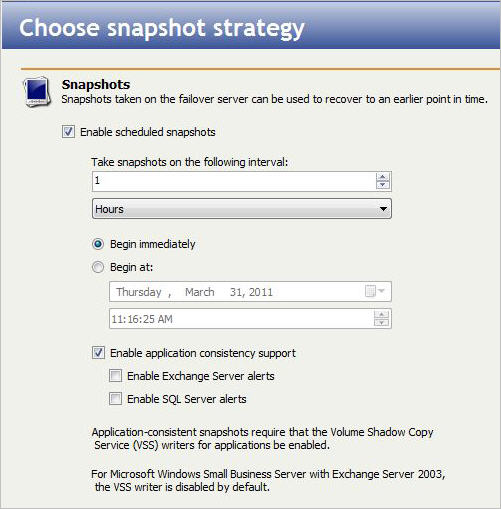
- Enable scheduled snapshots—By default, periodic snapshots are disabled. If desired, enable snapshots by selecting this option. Because Double-Take RecoverNow uses the Microsoft Volume Shadow Copy Service to create snapshots, your source and repository server must be using the NTFS file system. If you are using a FAT file system, the FAT volumes will not be included in the snapshot set, and when the snapshots are reverted, the FAT volume will not be time-consistent with the NTFS volumes.
- Take snapshots on the following interval—By default, Double-Take RecoverNow will take a snapshot of the repository server data every hour. If desired, increase or decrease the interval between snapshots.
- Begin immediately—If you want to start taking snapshots immediately after the Double-Take RecoverNow job is established, select this option.
- Begin at—If you want to start taking snapshots at a specific date and time, select this option and specify the date and time parameters.
- Enable application consistency support—If you want the snapshots to be application-consistent, select this option.
- Enable Exchange Server alerts—If Exchange Server is installed on the source, select this option. By default, Exchange data is automatically included when application consistency support is selected; however, if Exchange is not configured to allow snapshots, Exchange data is excluded and you will not be alerted. By selecting this option, you ensure that Exchange data is included in the snapshot, or if it is excluded for some reason, you will receive notification.
- Enable SQL Server alerts—If SQL Server is installed on the source, select this option. By default, SQL data is automatically included when application consistency support is selected; however, if SQL Server is not configured to allow snapshots, SQL data is excluded and you will not be alerted. By selecting this option, you ensure that SQL data is included in the snapshot, or if it is excluded for some reason, you will receive notification.
If you enable application consistency on Small Business Server (SBS) 2003 with Exchange Server, you must turn on the Exchange writer for the Volume Shadow Copy Service. By default, the setup program for SBS 2003 turns off the Exchange Server 2003 writer to prevent possible conflicts with NTBackup. To turn on the Exchange writer, refer to the instructions in the Microsoft Knowledge Base article at http://support.microsoft.com/kb/838183.
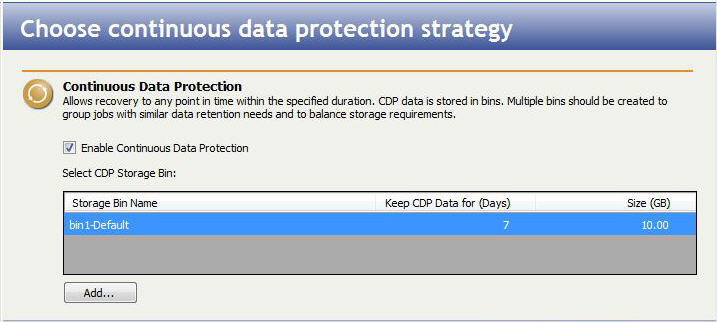
- Enable Continuous Data Protection—By default, continuous data protection is disabled. If desired, enable continuous data protection by selecting this option. This option is not available if you did not install TimeData. To use TimeData, the repository server must be using NTFS. If you are using a FAT file system, the FAT volumes will not be included in the continuous data protection and will be unavailable for point-in-time recovery.
Add—Click Add to configure continuous data protection. If you have previously configured continuous data protection on this server, the storage bin configuration will already exist.
As you create your storage bins, you should try to keep them each on their own physical disk. Ideally, you should keep the storage bin on a separate disk from your Double-Take RecoverNow data as well.
- Storage Bin Name—Enter a name to identify the storage bin. The keyword Default will be appended to the name of the first storage bin. Additional bins will have the ordinal number (second, third, fourth, and so on) appended to the storage bin name.
- Event cache file path—Enter the path where you want to store the event cache file or click Browse to select the folder from a directory drill-down list. The event cache is where the continuous data protection changes will be stored temporarily until they can be written to the event log.
- Event Cache File Size—Enter the maximum size, in GB, for the event cache file. The entire file size will be allocated when protection is enabled.
- Event log file path—Enter the path where you want to store the event log file or click Browse to select the folder from a directory drill-down list. Keep in mind that you need to select a location with sufficient space.
- Keep CDP Data for—By default, TimeData will maintain changes for seven days, which is the recommended retention period. If desired, modify the number of days to store data changes. If you increase the number of days, keep in mind space limitations on the repository server. The length of time you specify will apply to all jobs using this storage bin.
Once you have configured your storage bin, click Save. You may want to create additional storage bins to group jobs with similar data retention needs and to balance storage requirements. If you create multiple storage bins, you should configure them for separate physical disks, which will perform better than storage bins located on the same drive.
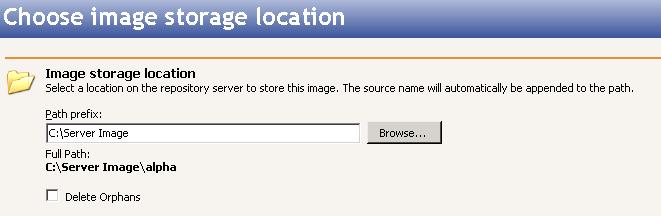
Select a location on the repository server to store the location of the source's data or image. The location you specify for Path prefix will automatically have the source server name appended to it, in order to distinguish the data or image from other data or images.
 Related Topics