To protect a standard cluster, you will be using the Double-Take Source Connection cluster resource and the Double-Take Availability Replication Console. This is a legacy console that is eventually being phased into the Double-Take Console.
-
If your source is a cluster, create a virtual server (including resources for an IP address, network name, and physical disk) on the source cluster. With this configuration, users will access their data from the source cluster, regardless of which node is currently in control. MSCS will handle failover between the nodes of the cluster. Double-Take Availability will handle failover between the source cluster and the target (cluster or standalone). See your Microsoft documentation if you need assistance creating a virtual server on the source cluster.
- If your target is a cluster, create a virtual server (including resources for an IP address, network name, and physical disk) on the target cluster. With this configuration, if there is a source failure, the data will be available for the users from the target cluster, regardless of which node is currently in control. MSCS will handle failover between the nodes of the target cluster. Double-Take Availability will handle failover between the source (cluster or standalone) and the target cluster. See your Microsoft documentation if you need assistance creating a virtual server on the target cluster.
-
On your source, create a replication set from the Replication Console.
If your source is a cluster, you need to create the replication set on the node which currently owns the group with the virtual server you want to protect.
- To access the Replication Console, select Start, Programs, Double-Take, Double-Take Replication Console.
- Right-click the source in the left pane of the Replication Console and select New, Replication Set.
- A replication set icon appears in the left pane under the source. By default, it is named New Replication Set. Rename the newly inserted replication set with a unique name by typing over the default name and pressing Enter. This process is similar to naming a new folder in Windows Explorer.
- Expand the tree under the replication set name to view the volume and directory tree for the source.
- Identify the data on the source associated with the group that you want to protect by selecting volumes, drives, directories, and/or specific files.
- After selecting the data for this replication set, right-click the new replication set icon and select Save. A saved replication set icon will change from red to black.
-
If your source is a cluster, you need to create a duplicate replication set on each of the other nodes in the cluster. Because the other nodes do not currently own the files, you will not be able to browse to select the data like you did on the first node. Therefore, you will have to manually enter the replication set data.
As an alternative to the following manual steps, you can stop the Double-Take service on the other nodes of the source cluster, copy the file DblTake.db from the first node to the other nodes, and then restart the Double-Take service.
- Right-click the replication set created on the owning node and select Properties.
- Record the exact drive and directories of each path displayed, including where the rule is included or excluded and if recursion is applied.
- Right-click a non-owning node and select New, Replication Set.
- Enter the exact, case-sensitive name for the replication set as specified on the owning node and press Enter.
- Right-click the replication set that you just created and select Properties.
- Click Add.
-
Enter the exact same replication set rules you recorded from the owning node. Be sure and mark the correct Include, Exclude and Recurse sub-directories options that need to be applied.
Each replication set rule on the non-owning nodes must be identical to the replication set rule on the owning node.
- After entering all of the replication set rules, save the replication set. The replication set rules will be saved even though the non-owning nodes do not have access to the locations right now. The rules will function properly when the node becomes an owner.
- On your cluster (source and/or target), you need to disable the standard Double-Take Availability connection controls so that the MSCS resource that you will be configuring later can control the Double-Take Availability connections.
- In the Replication Console, right-click a node of the source cluster and select Properties.
- Select the Setup tab.
- By default, the Automatically Reconnect During Source Initialization check box will be selected. Disable this option by clearing the check box.
- Click OK to save the changes.
- Repeat these steps on each node of the cluster(s).
- If your source is a standalone server, establish your connection through the Connection Manager.
- Right-click the replication set and select Connection Manager.
- Select the following options.
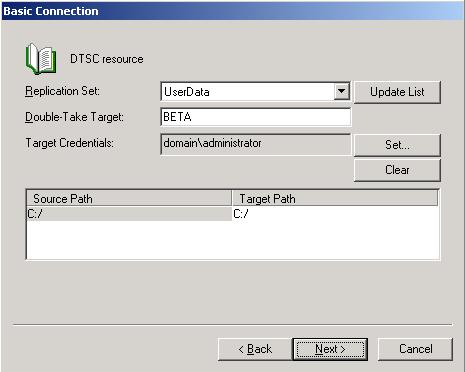
- Source Server—Specify the name of the standalone source server.
- Replication set—The replication name should already be specified. If it is not, select it from the list.
- Target Server—Specify the virtual server network name.
- Route—Specify the virtual server IP address.
- Mappings—Specify the One to One mapping.
- Use the default settings for the rest of the options.
- Click Connect to establish the connection.
- If your source is a cluster, establish your connection by creating and bringing online a Double-Take Source Connection resource. These instructions will vary depending on your operating system.

 Establishing your connection on Windows 2003