Open topic with navigation
Protecting Windows ESX virtual servers to an ESX server
Use these instructions for Windows ESX to ESX protection.
- Click Get Started from the toolbar.
- Select Double-Take Availability and click Next.
- Select Protect multiple ESX virtual machines and click Next.
-
Choose your source server. This is the ESX host that contains the virtual servers that you want to protect.
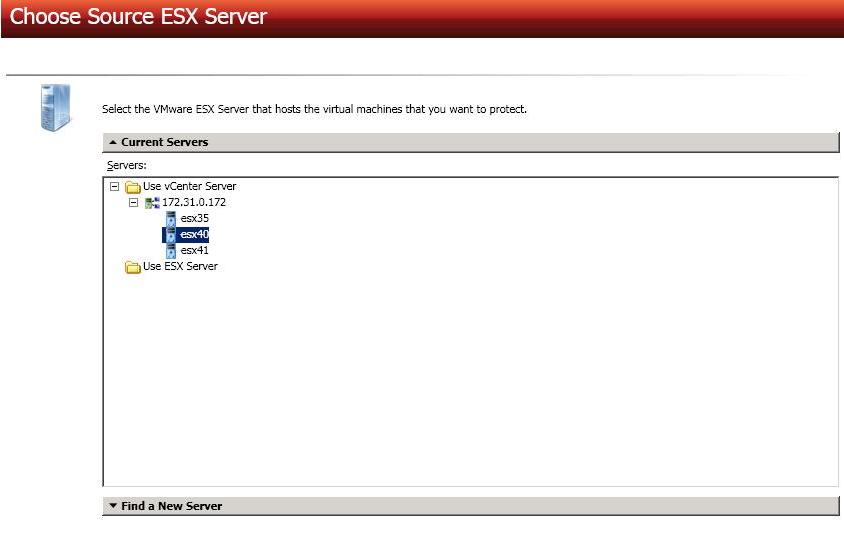
- Current Servers—This list contains the ESX servers currently available in your console session. Each vCenter server and its associated ESX hosts is listed. ESX hosts not associated with a vCenter server will appear in the Use ESX Server folder.
- Find a New Server—If the server you need is not in the Current Servers list, click the Find a New Server heading.
- VirtualCenter Server—Select your VirtualCenter server from the list. If your VirtualCenter server is not in the list, click Add VirtualCenter Server, specify the server and valid credentials, and click Add. If you are not using VirtualCenter, select None.
- ESX Server—Specify the name or IP address of the ESX server.
- User name—This field will only be available if you are not using VirtualCenter. In this case, specify the root user or another user that has the administrator role on the specified ESX server.
- Password—Specify the password associated with the User name you entered.
- Click Next to continue.
-
Select the virtual servers on your source that you want to protect. A separate job will be created for each source that you select for protection.
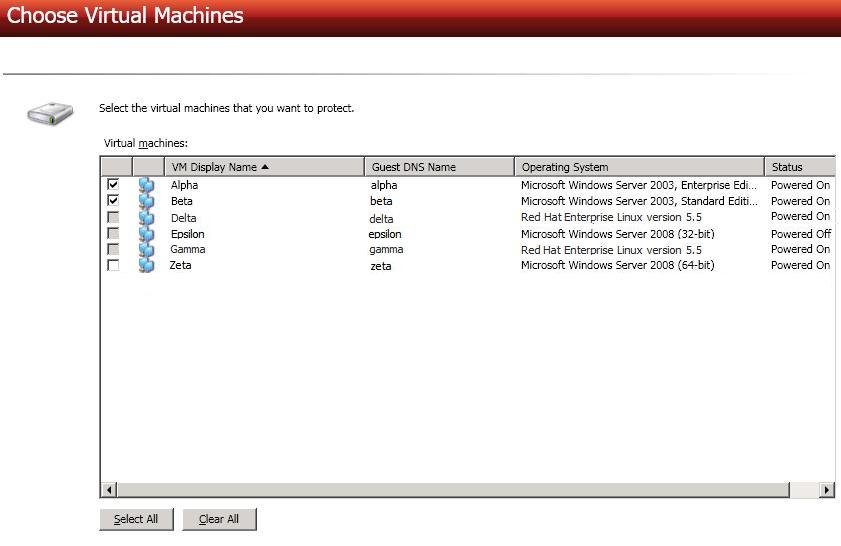
Each source can have no more than ten NICs enabled.
- Click Next to continue.
-
Choose your target server. This is the ESX host where your replica source virtual servers will be created.
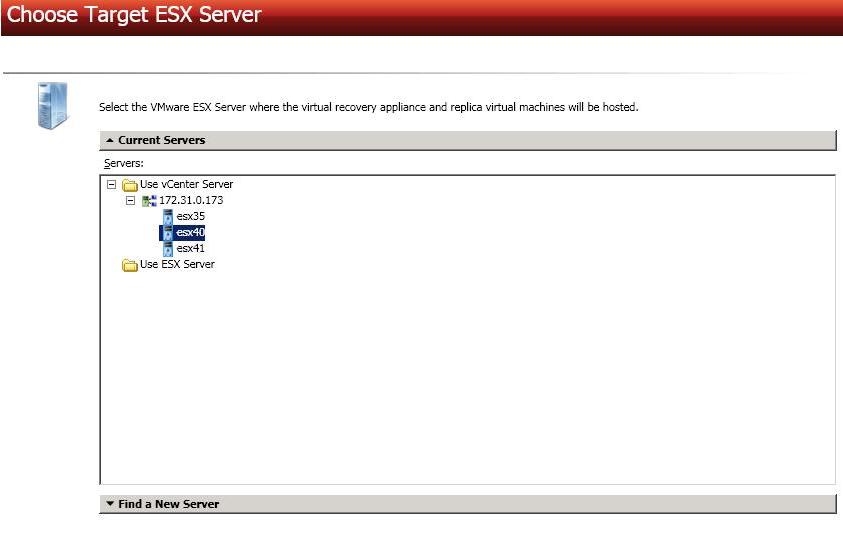
- Current Servers—This list contains the ESX servers currently available in your console session. Each vCenter server and its associated ESX hosts is listed. ESX hosts not associated with a vCenter server will appear in the Use ESX Server folder.
- Find a New Server—If the server you need is not in the Current Servers list, click the Find a New Server heading.
- VirtualCenter Server—Select your VirtualCenter server from the list. If your VirtualCenter server is not in the list, click Add VirtualCenter Server, specify the server and valid credentials, and click Add. If you are not using VirtualCenter, select None.
- ESX Server—Specify the name or IP address of the ESX server.
- User name—This field will only be available if you are not using VirtualCenter. In this case, specify the root user or another user that has the administrator role on the specified ESX server.
- Password—Specify the password associated with the User name you entered.
- Click Next to continue.
-
Select your virtual recovery appliance on your target ESX server. Only valid virtual recovery appliances will be displayed in the list. If necessary, click Provide Credentials and specify a valid user on the virtual recovery appliance you have selected. The user must be a member of the Double-Take Admin security group.
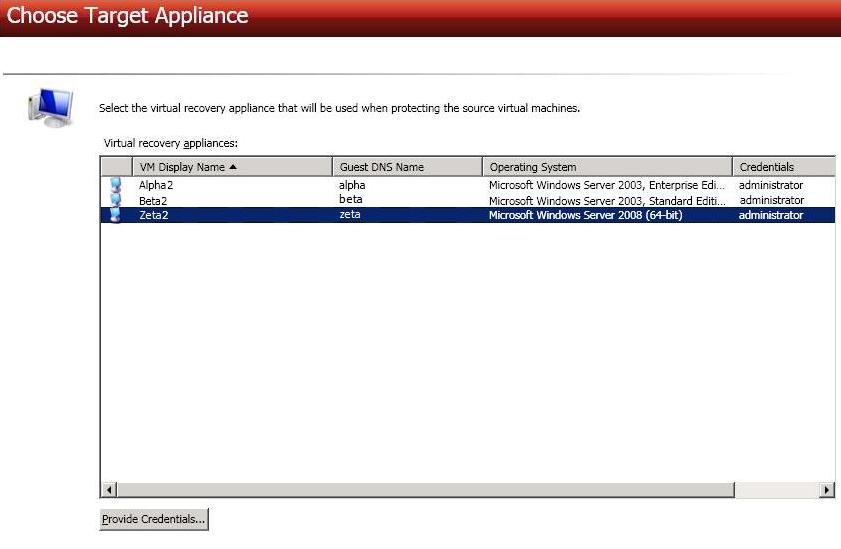
- Click Next to continue.
-
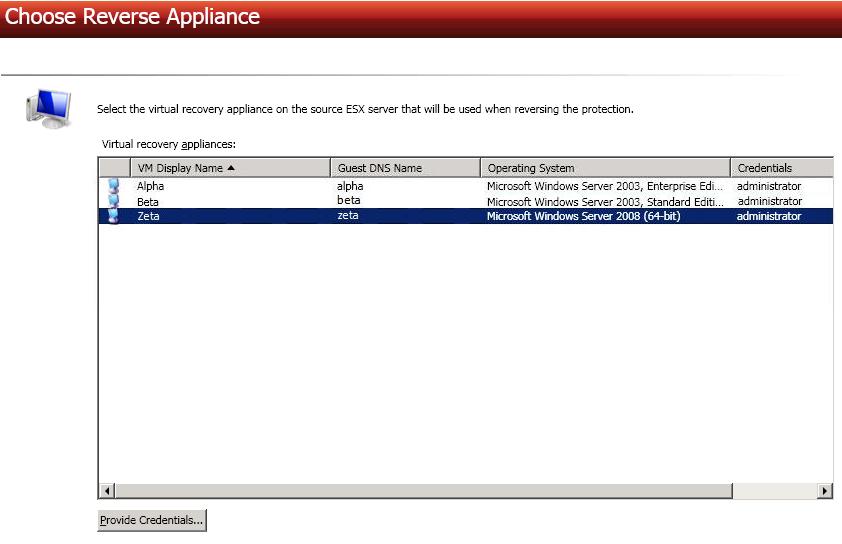
If desired, select a virtual recovery appliance on your source ESX server. This appliance will be used during the reverse process, allowing you to protect the source replica virtual server on the target back to the original source ESX host. If necessary, click Provide Credentials and specify a valid user on the virtual recovery appliance you have selected. The user must be a member of the Double-Take Admin security group. You can skip this step and select a reverse appliance after the job has been created, however, you must have a reverse appliance selected before failover.
- Click Next to continue.
-
Set your protection options.

- Map source virtual machines to target datastores—For each virtual server you are protecting, select a datastore on the target ESX host where the replica source virtual server will be created. If necessary, click Provide Credentials and specify a valid user on each virtual server.
- Map source virtual network to target virtual networks—For each virtual network on the source ESX host, select a network on the target ESX host to handle networking for the virtual servers after failover.
- Compress data at this level—Specify the level of compression that you want to use for your transmissions from the source to the target. If compression is enabled, the data is compressed before it is transmitted from the source. When the target receives the compressed data, it decompresses it and then writes it to disk.
- Send data to this target route—By default, Double-Take Availability will select a default target route for transmissions. If desired, select a different target route.
- Send data to this source route when reversing the protection—If you selected a reverse appliance, Double-Take Availability will select a default source route for transmissions. If desired, select a different source route.
- Limit bandwidth—Bandwidth limitations are available to restrict the amount of network bandwidth used for Double-Take Availability data transmissions. When a bandwidth limit is specified, Double-Take Availability never exceeds that allotted amount. The bandwidth not in use by Double-Take Availability is available for all other network traffic. If desired, enter a value, in kilobits per second, to limit data transmission. The value you enter is the maximum amount of data that will be transmitted per second.
- Click Next to continue.
- The Summary page displays all of the options you selected in your workflow. If you want to make any changes to any of the workflow settings, click Back to return to previous pages of the workflow.
- When you are satisfied with your workflow selections, click Finish, and you will automatically be taken to the Manage Jobs page.
If you need to modify a job's settings after it has been created, you can do so after the mirror has completed by highlighting the job on the Manage Jobs page, selecting View Job Details, and then clicking the View job properties link. You will be taken back to the Protection Summary page. If you click Change next to the Configuration section, you will be taken to the Set Protection Options page, which has slightly different options available than the Set Options page used when creating the job. For information on the options presented on the Set Protection Options page, see the options information for a physical to ESX job.