- Enable the modified NIC, knowing you will get the name conflict error. Disregard the error. Change the source name to a unique name in the domain and reboot when prompted.
- Change the source name to a unique name in a workgroup, not in the domain, and reboot when prompted. Enable the modified NIC.
- Stop the Workstation and Server services on the source. You may be prompted to stop other services. Stop those services also and note the service names for later. Enable the modified NIC. The server will not broadcast its name to the network because of the services you disabled.
- Your target is standing in for your source because of failover, and users are accessing their data from the target.
- Your source is back online with a unique IP address and no network name conflicts.
- The source and target can communicate with each other.
- All applications on the source are stopped.
- From the Replication Console on the target, right-click the source and select Remove.
- Depending on your configuration, the source may be automatically inserted back into the Replication Console. If it is not, select Insert, Server. Specify the source server and click OK.
-
From the Replication Console, select Tools, Restoration Manager.
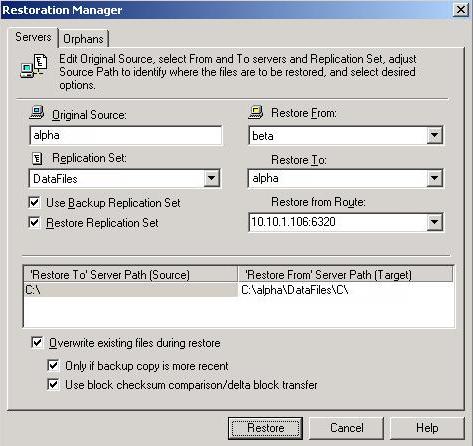
- Identify the Original Source machine. This is your source machine where the data originally resided.
-
Select the Restore From machine. This is the target machine where the copy of the data is stored.
Note: If your target is a cluster, you can specify just one node in the cluster and restore only from that node. If you need to have the cluster functionality (Microsoft failover from node to node) available during the restoration process, you will have to create a resource, like you did for your original connection, for the restoration process. See Protecting a standard cluster. Keep in mind when restoring, your target will function as your source, sending data to the target, which will be your original or new source.
- Replication Set contains the replication set information stored on the target machine (the machine in Restore From). If no replication sets are available, the list will be blank. Select the replication set that corresponds to the data that you need to restore.
- Select the Restore To machine. This is your temporary source that has the unique IP address.
- Select the Restore from Route. This is the IP address and port on the target that the data will be transmitted through. This allows you to select a different route for Double-Take Availability traffic. For example, you can separate regular network traffic and Double-Take Availability traffic on a machine with multiple IP addresses.
-
The Restore To Server Path and Restore From Server Path paths will automatically be populated when the replication set is selected. The restore to path is the directory that is the common parent directory for all of the directories in the replication set. If the replication set crosses volumes, then there will be a separate path for each volume. The restore from path is the path on the target server where the replicated files are located.
Note: Restoring across a NAT router requires the ports to be the same as the original connection. If the ports have been modified (manually or reinstalled), you must set the port numbers to the same values as the last valid source/target connection.
- Select the Use Backup Replication Set check box to use the target’s copy of the replication set database for the restoration. If this check box is not marked, you will be accessing the replication set information from the source.
- Select the Restore Replication Set check box to restore the target’s copy of the replication set database to the source during the restoration process.
- Select the restoration conditionals that you want to use.
- Overwrite existing files during restore—This option restores all existing files by overwriting them. Any files that do not exist on the source are written also. If this option is disabled, only files that do not exist on the source will be restored.
-
Only if backup copy is more recent—This option restores only those files that are newer on the target than on the source. The entire file is overwritten with this option.
Note: If you are using a database application, do not use the newer option unless you know for certain you need it. With database applications, it is critical that all files, not just some of them that might be newer, get mirrored.
- Use block checksum comparison/delta block transfer—Specify if you want the restoration process to use a block checksum comparison to determine which blocks are different. If this option is enabled, only those blocks (not the entire files) that are different will be restored to the source.
- If you want to configure orphan files, click the Orphans tab. The same orphan options are available for a restoration connection as a standard connection.
- If your original source was using Replicate NT Security by Name, you must enable that option on the target before you start the restoration. The option is available on the target’s Server Properties on the Source tab.
-
Click Restore to begin the restoration. You can identify a restoration connection because it is enclosed in parenthesis ( ) and it has _Restore appended to the end of the replication set name. The initial restoration is complete when the Mirror Status is Idle. After the Mirror Status is Idle, the connection will continue replicating any on-going data changes from the target to the source.
Note: During the restoration, only the data is restored back to the source. Shares are not created on the source during the restoration. Shares that were created on the target during failover will need to be created manually on the source.
- Deny user access to the target, so that no additional updates can be made to the data on the target.
- Stop all applications on the target, allowing the data to become quiescent.
- In the Replication Console, watch the restoration connection until activity has ended and replication is in a Ready state. This will happen as the final data in queue, if any, is applied on the source. The replication Ready state indicates replication is waiting for new incoming data changes.
- Open the Failover Control Center.
- Select the target that is currently standing in for the failed source.
-
Select the failed source and click Failback.
Note: If the target is a cluster, you will need to determine the active node and failback from that node. Then you will need to failback from each of the other nodes to synchronize all of the nodes of the cluster.
- You will be prompted that the restoration connection is still in place. Continue with the failback. If you have a pre-failback script configured, it will be started.
- When failback is complete, the post-failback script, if configured, will be started. When the script is complete, you will be prompted to determine if you want to continue monitoring the source, do not select either option. Leave the prompt dialog box open as is.
-
Since failback has occurred, your restoration connection is no longer valid and will be marked with a red X. Disconnect the restoration connection.
Note: If your target is a cluster, take the Double-Take Source Connection resource offline to disconnect the connection.
- On the source, change the IP address that you modified earlier to the unique address back to its original address. You can also enable any other NICs on the source.
- Also on the source, change the source name back to its original name and reboot, or restart the Workstation, Server, and any other services you were prompted to stop.
- Once the source is back online, users can reconnect to the source.
- Right-click the source and select Remove.
- Depending on your configuration, the source may be automatically inserted back into the Replication Console. If it is not, select Insert, Server. Specify the source server and click OK.
At this time, you can go back to the dialog box in the Failover Control Center. Select Continue or Stop to indicate if you want to continue monitoring the source. After you have selected whether or not to continue monitoring the source, the source post-failback script, if configured, will be started.
Note: The source must be online and Double-Take Availability must be running to ensure that the source post-failback script can be started. If the source has not completed its boot process, the command to start the script may be lost and the script will not be initiated.
 Related Topics