You are here: Verification > Configuring the verification log

Configuring the verification log

A verification log is created on the source during the verification process. The log identifies what is verified as well as which files are not synchronized.

  1. Open the Replication Console.
  2. Right-click the source server on the left pane of the Replication Console and select Properties.
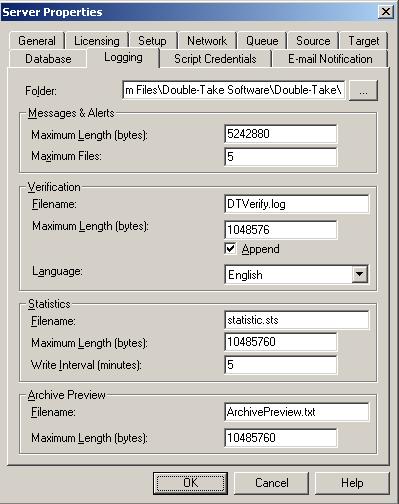
  3. Select the Logging tab.

  4. At the top of the window, Folder identifies the location where the log files identified on this tab are stored. By default, the log files are stored in the same directory as the Double-Take Availability program files.
  5. Under the Verification section, Filename contains the base log file name for the verification process. The replication set name will be prefixed to the base log file name. For example, since the default is DTVerify.log, the verification log for the replication set called UserData would be UserData DTVerify.log.
  6. Specify the Maximum Length of the log file. The default is 1048576 bytes (1 MB). When the log file reaches this limit, no additional data will be logged.
  7. By default, the log is appended to itself each time a verification process is completed. Clear the Append check box if you do not want to append to the previous log file.


    Note:  Changes made to the verification log in the Server Properties, Logging tab will apply to all connections from the current source machine.


  8. Specify the Language of the log file. Currently, English is the only available language.
  9. Click OK to save the settings.

In the log file, each verification process is delineated by beginning and end markers. A list of files that are different on the source and target is provided as well cumulative totals for the verification process. The information provided for each file is the state of its synchronization between the source and the target at the time the file is verified. If the remirror option is selected so that files that are different are remirrored, the data in the verify log reflects the state of the file before it is remirrored, and does not report the state of the file after it is remirrored. If a file is reported as different, review the output for the file to determine what is different.

Sample verification log

The mask must be converted in order to determine what attributes are assigned to a file. The mask is a hexadecimal number corresponding to a binary number that indicates what the attributes are. Using the following steps, you can determine how the mask corresponds to the attributes of a file.

  1. Each mask begins with 0x. Identify the hexadecimal number after the constant 0x. For example, if the mask is 0x23, then the hexadecimal number you are interested in is 23. The hexadecimal number may be up to four digits.
  2. Convert the hexadecimal number to its 16-digit binary equivalent. You can use the Windows calculator for this conversion.
    1. Select Start, Programs, Accessories, Calculator.
    2. Switch to scientific view, if it is not already in that view, by selecting View, Scientific.
    3. Select Hex.
    4. Enter the hexadecimal number, for example 23, as specified in your verification log.
    5. Select Bin and the hexadecimal number will change to the binary equivalent.
    6. Pad the beginning of the binary equivalent with zeroes (0) so that the number is 16 digits long. For example, hexadecimal number 23 converts to 100011, so the 16-digit binary equivalent would be 0000000000100011.
  3. Determine what number (0 or 1) appears in each position of the binary number. Because binary numbers count from right to left, start with position 1 on the right.
  4. Using the list above, identify those attributes that are enabled by those positions equal to one (1). The positions equal to zero (0) are disabled and that attribute does not apply. So hexadecimal number 23, which converted to 0000000000100011, indicates read only, hidden, and archive. Another example might be mask 0x827 which converted to binary is 0000100000100111. Positions 1-3, 6, and 12 are all enabled which indicates the file is read only, hidden, archive, and compressed.


    Note:  Files that were replicated with the Replicate NT Security by Name feature enabled, will be identified as different in the log file because of the local name attribute. The files will be the same.


Related Topics