Open topic with navigation
Configuring a like-named cluster
If you have not done so already, launch the Protecting an Exchange Server workflow.
The process for protecting a cluster with a like-named (standby) cluster is similar to protecting a standard cluster. The following instructions point out the differences in configuration. For more information about basic protection functions, see Protecting an Exchange server.
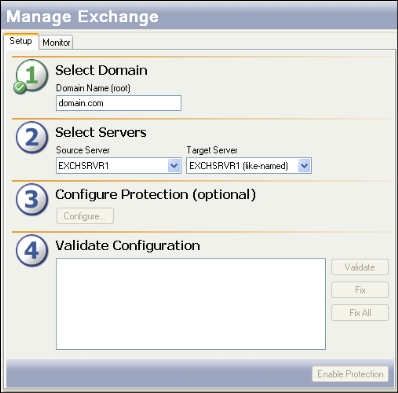
- In the Source Server field, select the source cluster that you want to protect.
- In the Target Server field, select the same server.
|
Note:
|
The server name will be appended with the suffix “(like-named)”
|
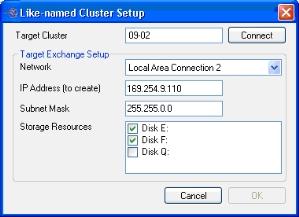
- After you select a like-named cluster for the target, you will need to configure the like-named cluster. After you select the target server, the Like-named cluster setup dialog box will appear.
- Enter the following information:
- Target Cluster—Enter the name of one of the target nodes, then click Connect.
- Network—Select the NIC to which you will assign the IP address.
- IP Address (to create)—Enter a new IP address for the target to use when it stands in for the source.
- Subnet Mask—Enter the subnet mask to use for the new IP address.
- Storage Resources—The Application Manager will automatically select the required storage resources on the target, provided that they exist (for example, if the source and target both have E:\ and S:\). Verify that the drive letters where Exchange data is located are selected.
|
Note:
|
- You can not de-select a storage resource that exists on both the source and target.
- If the drive letters on the source and target do not match, then not all required data will be selected automatically. You will need to select it manually. The selected storage resources must be in the same group.
|
- When you are finished, click OK to return to the Manage Exchange window.
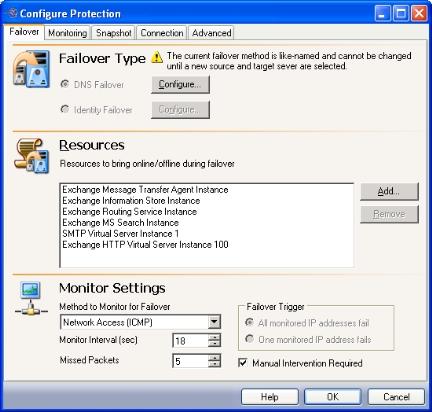
- On the Manage Exchange window, click Configure to open the Configure Protection window, then select the Failover tab.
- DNS Failover is the only option available for configuring protection with like-named clusters. For more information about DNS failover, see DNS failover.
- If you want to modify DNS configuration options, click Configure. The Configure DNS Failover window will appear.
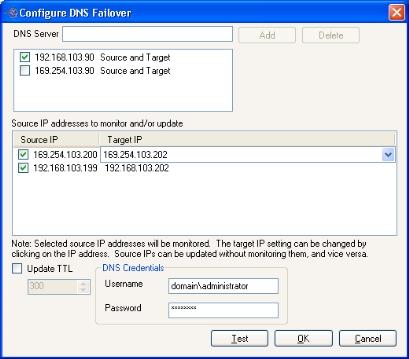
- On the Configure DNS window, you can modify the TTL value for the DNS record. You can also specify the user credentials needed to modify DNS. When you are finished, you can click Test to test the DNS configuration for the selected DNS server(s), or click OK to return to the Configure Protection window.
|
Note:
|
Decreasing the TTL value will increase the speed at which clients get the updated information.
If the server that the Application Manager is running on has a problem connecting to the DNS server through WMI, the TTL record will not be updated. This will cause the Application Manager to return an error that the RPC server is unavailable
|
- After you have changed the configuration parameters, click OK to apply the settings and return to the Manage Exchange window. If you click Cancel, any changes you have made will be discarded and the previous configuration parameters will be used.
- Click Validate to validate the selected cluster pair. The validation proceeds exactly like validation for other methods of failover.
- Click Enable Protection to enable protection for the source cluster.
Next step: Enable protection