Specify the source server that you want to protect. This is the physical or virtual server that you want to protect.
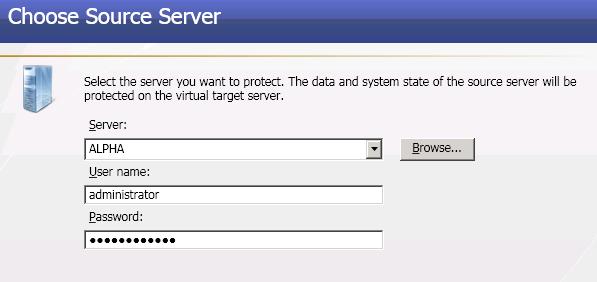
- Server—Specify the name or IP address of the physical or virtual server that you want to protect. You can click Browse to select a server from a network drill-down list.
- User name—Specify a user that is a member of the Double-Take Admin and local administrator security groups on the source. If you want to use a domain user account, enter a fully-qualified domain name in the format domain\username or username@domain.
- Password—Specify the password associated with the User name you entered.
| Note: |
If you enter the source server's fully-qualified domain name, the Double-Take Console will resolve the entry to the server short name. If that short name resides in two different domains, this could result in name resolution issues. In this case, enter the IP address of the server. Your source can have no more than four NICs enabled, except if your source is ESX version 4.x. In that case, you can have up to ten NICs. |
Choose the volumes on the source server that you want to protect.
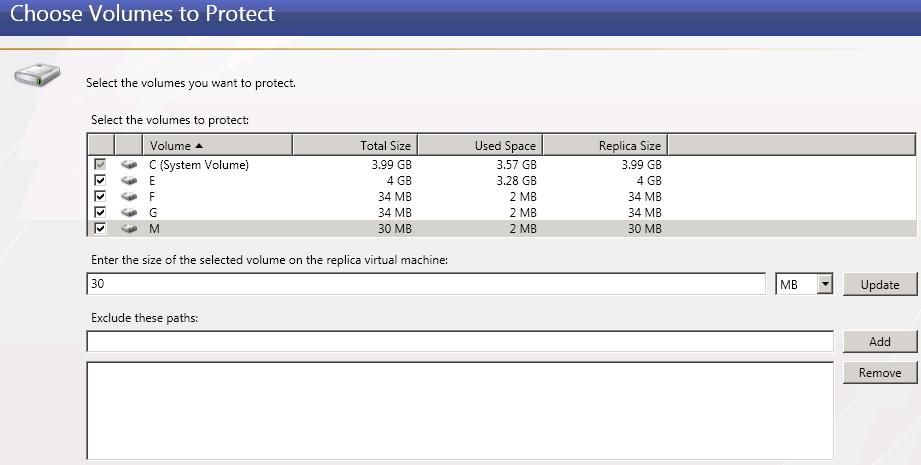
- Select the volumes to protect—By default the system volume will be selected for protection. You will be unable to deselect the system volume. Select any other volumes on the source that you want to protect.
- Enter the size of the selected volume on the replica virtual machine—Highlight a volume that you are protecting and specify the size, including the value in MB or GB, of the replica virtual machine on the target. The value must be at least the size of the specified Used Space on that volume. Click Update to refresh the Replica Size value in the table. Repeat this process for each volume you are protecting.
- Exclude these paths—If there are specific paths on a volume that you do not want to protect, specify those locations. Keep in mind that missing data may impact the integrity of your applications.
| Note: | If the size of the replica virtual machine is identical to the size of the source volume and the source has less than 20 MB of free disk space remaining, you may run out of disk space on the replica due to differences in how the virtual disk's block size is formatted. To avoid this issue, specify the size of your replica virtual machine to be at least 20 MB larger. |
Specify the target server. If you are protecting to a Hyper-V server, this is the name of the Hyper-V server. If you are protecting to a ESX server, this is the host name of your virtual recovery appliance.
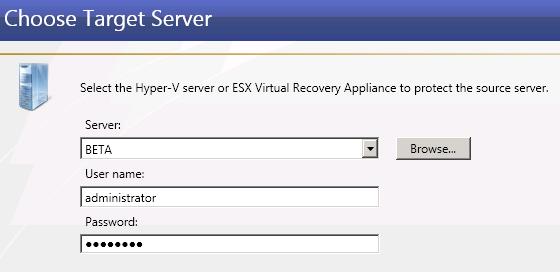
- Server—Specify the name or IP address of the target server. You can click Browse to select a server from a network drill-down list.
- User name—Specify a user that is a member of the Double-Take Admin security group. If your target is a Hyper-V server, the user must also have administrative rights for Microsoft Hyper-V. If you want to use a domain user account, enter a fully-qualified domain name in the format domain\username or username@domain.
- Password—Specify the password associated with the User name you entered.
| Note: |
If you enter the target server's fully-qualified domain name, the Double-Take Console will resolve the entry to the server short name. If that short name resides in two different domains, this could result in name resolution issues. In this case, enter the IP address of the server. |
If you are protecting to an ESX server, specify the ESX server information for your target virtual recovery appliance.
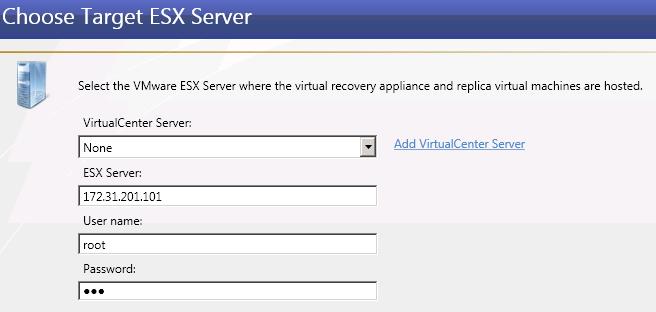
- VirtualCenter Server—Select your VirtualCenter server from the list. If your VirtualCenter server is not in the list, click Add VirtualCenter Server, specify the server and valid credentials, and click Add. If you are not using VirtualCenter, select None.
- ESX Server—Specify the name or IP address of the ESX server.
- User name—This field will only be available if you are not using VirtualCenter. In this case, specify the root user or another user that has the administrator role on the specified ESX server.
- Password—Specify the password associated with the User name you entered.
If you are using a Hyper-V target, select a location on the target for the replica virtual machine.
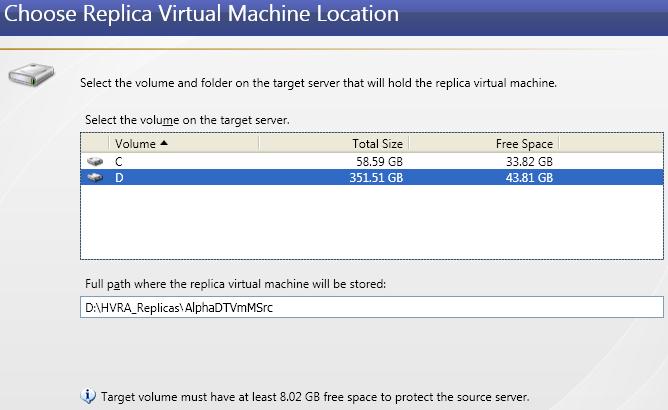
- Volume—Select one of the volumes from the list to indicate which volume on the target where you want to store the new virtual server when it is created. The target volume must have enough Free Space to store the source data. The minimum size is noted at the bottom of the page.
- Full path where the replica virtual machine will be stored—Specify a location on the selected Volume to store the replica of the source. By specifying an existing folder, you can reuse an existing virtual machine on your Hyper-V target created by a previous protection job. This can be useful for pre-staging data on a virtual machine over a LAN connection and then relocating it to a remote site after the initial mirror is complete. When you reuse a virtual machine, Double-Take Availability performs a difference mirror which saves time. Use the following steps to reuse a virtual machine on a Hyper-V target.
- Create a protection job in a LAN environment, letting Double-Take Availability create the virtual disk for you.
- Complete the mirror process locally.
- Disconnect and delete the protection job and when prompted, select to Keep and register the replica virtual machine.
- From the Hyper-V manager, delete the replica virtual machine, which will delete the virtual machine configuration but will keep the associated .vhd files.
- Shut down and move the Hyper-V target server to your remote site.
- After the target server is back online at the remote site, create a new protection job for the same source server and select to reuse the existing virtual machine when prompted. Double-Take Availability will reuse the existing .vhd files and perform a difference mirror over the WAN to bring the virtual machine up-to-date.
If you are using an ESX target, select a location on the target for the replica virtual machine.
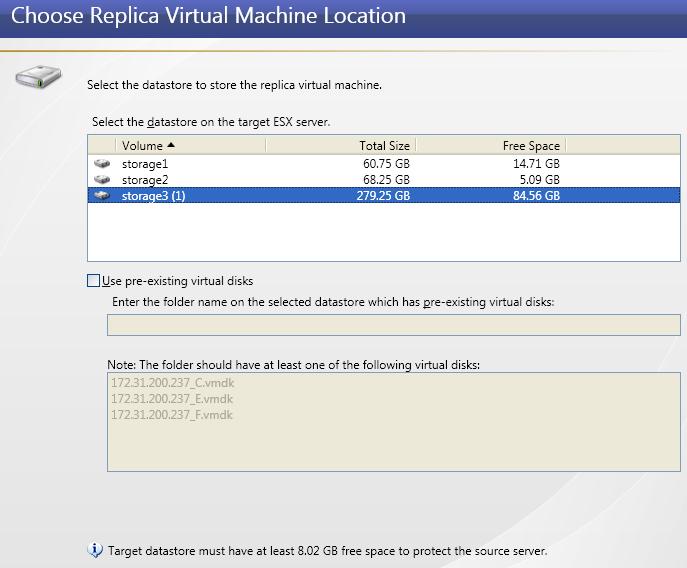
- Volume—Select one of the volumes from the list to indicate which volume on the target where you want to store the new virtual server when it is created. The target volume must have enough Free Space to store the source data. The minimum size is noted at the bottom of the page.
-
Use pre-existing virtual disks—You can reuse an existing virtual disk on your ESX target, rather than having Double-Take Availabilitycreate a virtual disk for you. This saves time by skipping the virtual disk creation steps and performing a difference mirror instead of a full mirror. In order to use a pre-existing virtual disk, it must be a valid VMware virtual disk. It cannot be attached to any other virtual machine, and the virtual disk size cannot be changed.
Because Double-Take Availability will skip the virtual disk creation steps when using a pre-existing disk, Double-Take Availability will instead copy your existing virtual disk to the default VMware new virtual machine location. Therefore, it is important that you do not place your existing virtual disk in the new folder location that VMware will create. Put the pre-existing virtual disk in a temporary location on the target. Specify this temporary location for Enter the folder name on the selected datastore which has pre-existing virtual disks.
In order for Double-Take Availability to find the pre-existing disk, the virtual disk file names must be formatted using the convention SourceServer_DriveLetter. For example, if your source server is Alpha and you are protecting drives C and D, Double-Take Availability will look for the file names Alpha_C.vmdk and Alpha_D.vmdk. If you are using IP addresses, substitute the IP address for the server name. For example, if the IP address for server Alpha is 172.31.10.25 then Double-Take Availability will look for the file names 172.31.10.25_C.vmdk and 172.31.10.25_D.vmdk.
If you originally created a virtual disk and specified the source server by its IP address, the pre-existing virtual disk file name cannot use the server name. However, you can rename that file and its associated -flat.vmdk file to use the IP address. The reverse is also true. If you originally specified the source server by its name, the pre-existing virtual disk file name cannot use the server’s IP address. However, you can rename the file and its associated -flat.vmdk to use the source name. For example, if you originally created a virtual disk and specified the source by its IP address, you need to rename the file source_name_drive.vmdk to source_IPaddress_drive.vmdk. You also need to rename the file source_name_drive-flat.vmdk to source_IPaddress_drive-flat.vmdk. The reverse (change source_IPaddress to source_name for both files) is also true. Additionally, you will need to edit the .vmdk file manually because it contains the name of the -flat.vmdk file. Modify the reference to the -flat.vmdk file to the new name you have specified using any standard text editor.
In a WAN environment, you may want to take advantage of the Use pre-existing virtual disks feature by using a process similar to the following.
- Create a protection job in a LAN environment, letting Double-Take Availability create the virtual disk for you.
- Complete the mirror process locally.
- Disconnect the protection job.
- Shut down and move the ESX target server to your remote site.
- After the target server is back online at the remote site, create a new protection job for the same source server and select to Use pre-existing virtual disks. Double-Take Availability will reuse the existing .vhd files and perform a difference mirror over the WAN to bring the virtual machine up-to-date.
Configure the replica virtual machine.
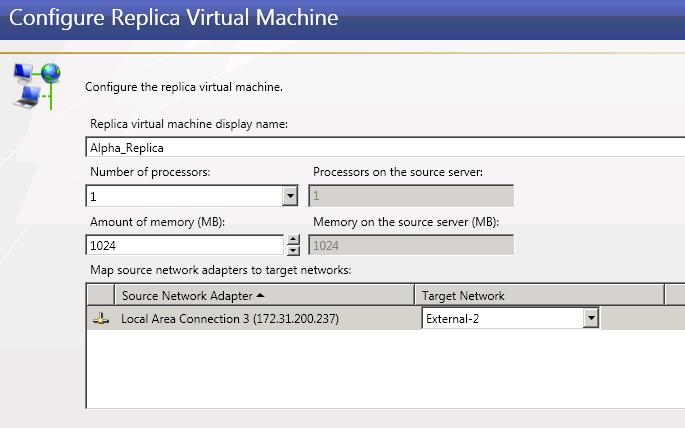
- Replica virtual machine display name—Specify the name of the replica virtual machine. This will be the display name of the virtual machine on the host system.
- Number of processors—Specify how many processors to create on the new virtual machine. The number of processors on the source is displayed to guide you in making an appropriate selection. If you select fewer processors than the source, your clients may be impacted by slower responses.
- Amount of memory—Specify the amount of memory, in MB, to create on the new virtual machine. The memory on the source is displayed to guide you in making an appropriate selection. If you select less memory than the source, your clients may be impacted by slower responses.
- Map source network adapters to target network adapters—Identify how you want to handle the network mapping after failover. The Source Network Adapter column lists the NICs from the source. Map each one to a Target Network, which is a virtual network on the target.
Specify your protection settings.
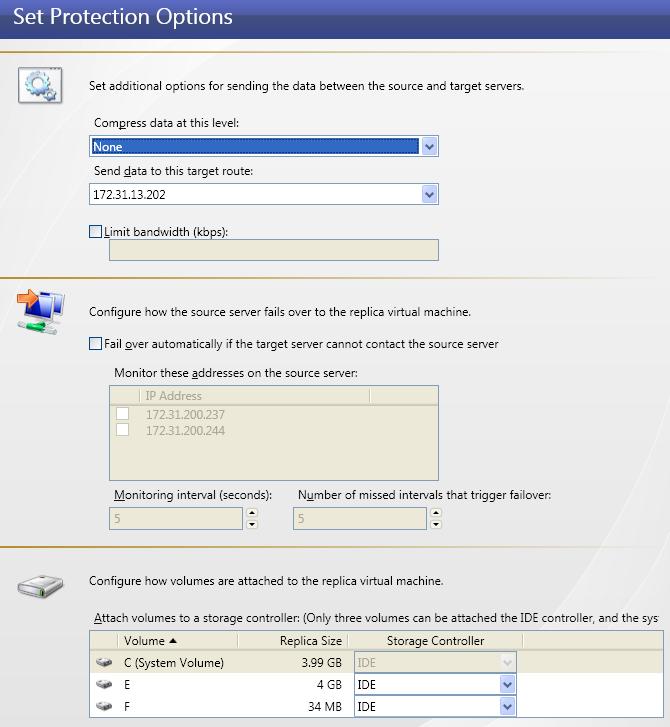
The fields on this screen will vary depending on if you are using an ESX target or a Hyper-V target.
- Compress data at this level—Specify the level of compression that you want to use for your transmissions from the source to the target. If compression is enabled, the data is compressed before it is transmitted from the source. When the target receives the compressed data, it decompresses it and then writes it to disk.
- Send data to this target route—By default, Double-Take Availability will select a default target route for transmissions. If desired, select a different target route for transmissions.
- Limit bandwidth—Bandwidth limitations are available to restrict the amount of network bandwidth used for Double-Take Availability data transmissions. When a bandwidth limit is specified, Double-Take Availability never exceeds that allotted amount. The bandwidth not in use by Double-Take Availability is available for all other network traffic. If desired, enter a value, in kilobits per second, to limit data transmission. The value you enter is the maximum amount of data that will be transmitted per second.
- Fail over automatically if the target server cannot contact the source server—If this option is selected, failover will automatically occur when the target can no longer contact the source. If this option is disabled, you will have to monitor communications between the target and source and manually initiate failover when the target can no longer contact the source. In either case, failover is not available until after the initial mirror has been completed.
- Monitor these addresses on the source server—If you have enabled automatic failover, specify the IP addresses on the source that the target should monitor. Failover will be triggered when one of the monitored IP addresses is identified as failed.
- Monitoring interval—Specify the number of seconds between monitor requests sent from the target to the source to determine if the source is online.
- Number of missed intervals that trigger failover—Specify the number of monitor replies sent from the source to the target that can be missed before assuming the source has failed.
- Attach volumes to a storage controller—If you are using a Hyper-V target, you can specify the type of Storage Controller that you want to use for each volume on the Hyper-V target.
| Note: | To achieve shorter delays before failover, use lower interval and missed interval values. This may be necessary for servers, such as a web server or order processing database, which must remain available and responsive at all times. Lower values should be used where redundant interfaces and high-speed, reliable network links are available to prevent the false detection of failure. If the hardware does not support reliable communications, lower values can lead to premature failover. To achieve longer delays before failover, choose higher values. This may be necessary for servers on slower networks or on a server that is not transaction critical. For example, failover would not be necessary in the case of a server restart. |
| Note: |
A maximum of three volumes can be attached to an IDE controller. If you are protecting more than three volumes on the source, you will need to install the Hyper-V Integration Components to acquire a SCSI device. See your Hyper-V documentation for more information. If your source is Windows 2003 or Windows 2008 with no service packs and you have selected a SCSI controller, you will need to manually install the Hyper-V Integration Components after failover to attach these volumes to the replica virtual machine. |
 Related Topics