Open topic with navigation
Configuring SQL database protection
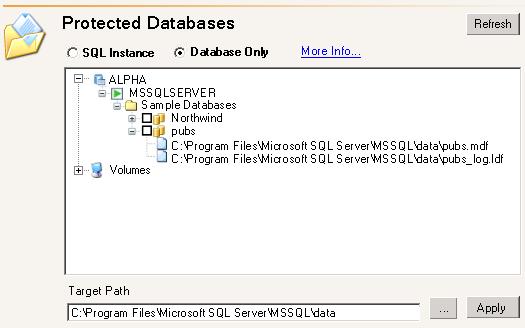
If you are protecting SQL, you can protect the SQL instance or only the database only.
- Make sure you have a valid domain and servers specified, click Configure from the main Application Manager page, and then select the Connection tab.
| Note: |
The fields on the Connection tab will vary depending on the type of application you are protecting. |
- Select if you want to protect the SQL Instance or the Database Only. The Protected Databases options and list will be disabled if you have enabled Override Generated Rules on the Advanced tab.
- SQL Instance—This option will protect the entire SQL program and data files (except the \binn directory). With this option, end-users can access the SQL data from the target in the event of a failure. With this option, the source and target servers must have the following configuration.
- The servers must have the same version of SQL (major and minor versions).
- The servers must have the same logical drive structure where the SQL program and data files are stored.
- The servers must have the same named instances, unless you are running Application Manager in advanced mode. In this case, you can identify instances to protect that are offline or do not exist on the target. The Manage SQL Server Instances dialog will only appear if you two or more SQL instances (default plus one or more named instances or two or more named instances with no default instance).
- The TcpPort for the named instances will be different. This is acceptable.
- You can exclude user databases from protection, but the system databases (except for tempdb) are required.
- You may want to exclude the tempdb database to reduce mirroring and replication traffic.
- Database Only—This option will protect the .mdf, .ldf, and .ndf files. With this option, the databases will be attached to the target in the event of a failure and then end-users an access the data. This option is intended for advanced users only. During the validation process, you will have the opportunity to transfer user logins and permissions (both server and database-level) and certain SQL Server registry and configuration settings to the target server. This will allow users to access the data associated with the selected database(s), but no other server-level functionality will be transferred to the target server, including but not limited to Job Server configuration, Full-Text service configuration, SQL Replication configuration, linked servers, remote servers, and backup devices.
With this option, the source and target servers must have the following configuration.
- You must configured any SQL Server replication on the protected source databases on the target after failover.
- Transparent Data Encryption (TDE) is not supported for SQL 2008 when using database only mode.
- Attempting to attach a replicated SQL database on the target server after failover outside of the Application Manager can fail.
- The Double-Take service account (typically the target's LocalSystem account) is the account used to attach and detach databases on failover and failback. When the database is detached by the failover and failback scripts, the Double-Take service account becomes the owner of those files that make up the database (*.mdf, *.ldf, and so on). Any attempts to manually attach the database may fail if the user account does not yet have NTFS permissions to access the physical files. To change the permissions on an individual file, perform these steps on each file that is part of the database's file list.
- In Windows Explorer, right-click the folder that contains the physical files for the database that needs to be manually attached.
- Select Properties.
- On the Security tab, determine if the user account has NTFS permissions for that folder.
- If the user account does not have specific or inherited permissions, click the Add button.
- Enter the user account name (such as domain\administrator).
- After the user account has been added, give the account Full Control permissions.
- Make sure that the subfolders and files are set to inherit these rights, then click OK.
- If you are working in a many-to-one scenario, and you have two SQL servers and each has only the default instance installed, you can protect databases from both servers' default instances provided that the database names are unique. For example, if both servers' default instances have a database named Accounting, you can only protect and failover one server's copy of the database because SQL on the target will not allow you to attach more than one copy of the same-named database. The first server to failover will attach its Accounting database, while the second server to failover will not attach its Accounting database.
If your two SQL servers have unique instances installed, you can protect databases from both servers if the target has at least those two instances installed.
Keep in mind, if the database names (accounting1.mdf and accounting2.mdf) or locations on the target (\source1\accounting1\accounting.mdf and \source2\accounting2\accounting.mdf) are unique, you can protect and failover both databases to the same target.
- If you selected Database Only, you can highlight a non-system database and then identify a unique Target Path. Keep in mind that if you are protecting multiple databases, specifying a unique target path will impact the location of any databases in the same or lower directory structure. For example, if you specify a unique target path for \level1\level2\database.mdf, the target path for level1\level2\level3\database.mdf will also be in that path. Click the ellipse (...) button to search for a target path and click Apply to save the setting.
- If desired, you can select additional data to protect under the Volumes folder.
- Click Refresh if you need to refresh the items in the tree view.
- Click OK to save the settings.
 Related Topics