- From target repository server—If you do not have an existing protection job, right-click your target repository server on the Servers page and select Recover.
- From protection job—If you have an existing protection job, right-click the protection job on the Jobs page and select Recover Data.
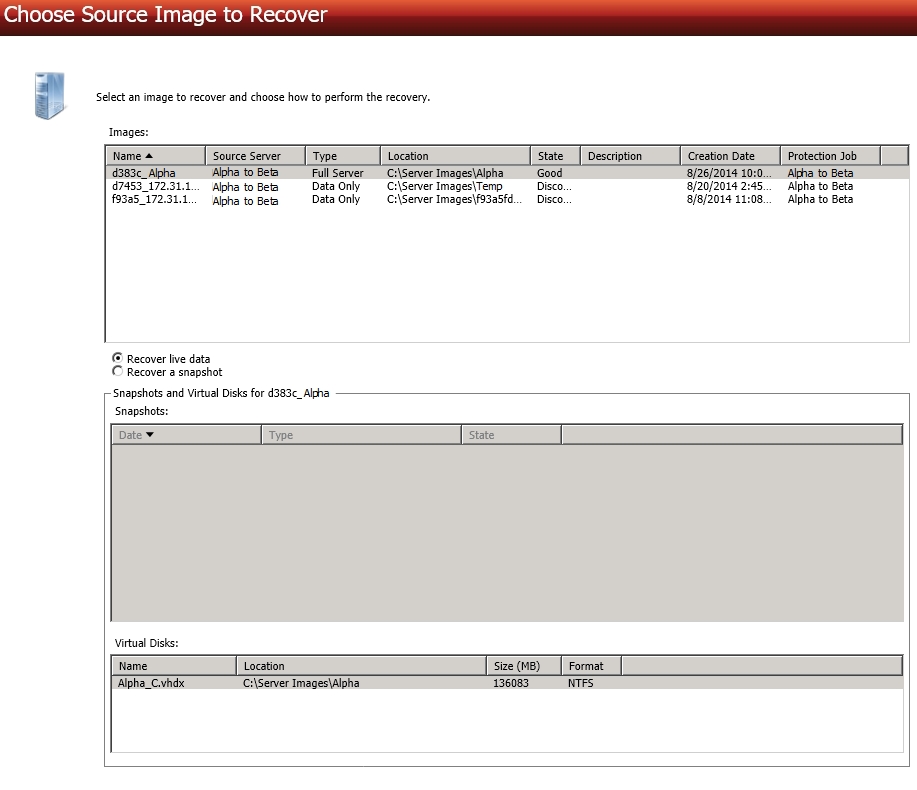
Choose the image that you want to recover. When you select a source in the image list, the snapshots and virtual disks associated with that source will be displayed. Select if you want to recover the live data or the snapshot data. If you select to recover to snapshot data, be sure and select the snapshot.
Choose the data from your source image that you want to recover.
- Full Server DR Recovery—Select this option if you want to recover your entire server. You must have protected your entire server to be able to recover your entire server. If you only protected data, this option will not be available.
- Files and Folders DR Recovery—Select this option if you only want to recover data. You can select this option and recover specific data, even if you originally protected your entire server.
If the workload you are looking for is not displayed, enable Show all workload types. The workload types in gray text are not available for the source server you have selected. Hover your mouse over an unavailable workload type to see a reason why this workload type is unavailable for the selected source.
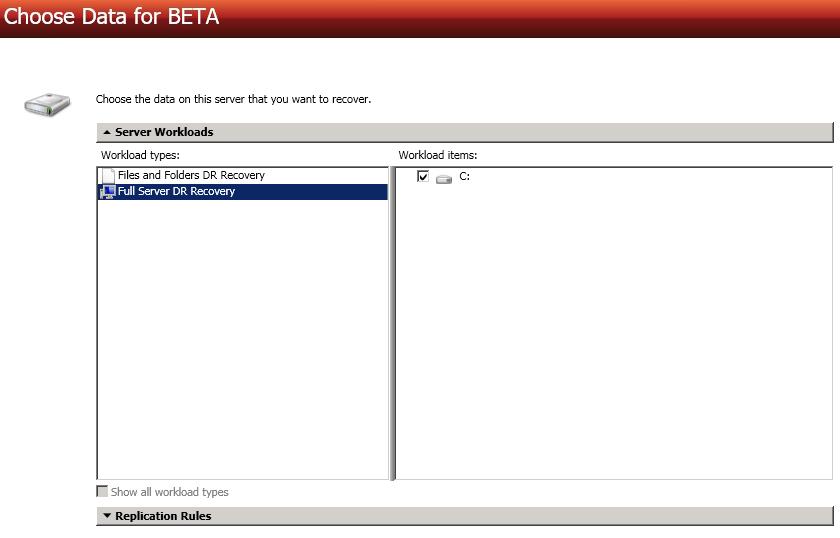
To select your files and folders in more detail, click the Replication Rules heading and expand the volumes under Folders.
If you return to this page using the Back button in the job creation workflow, your Workload Types selection will be rebuilt, potentially overwriting any manual replication rules that you specified. If you do return to this page, confirm your Workload Types and Replication Rules are set to your desired settings before proceeding forward again.
Choose your target recovery server. This is the server where the protected data will be recovered.
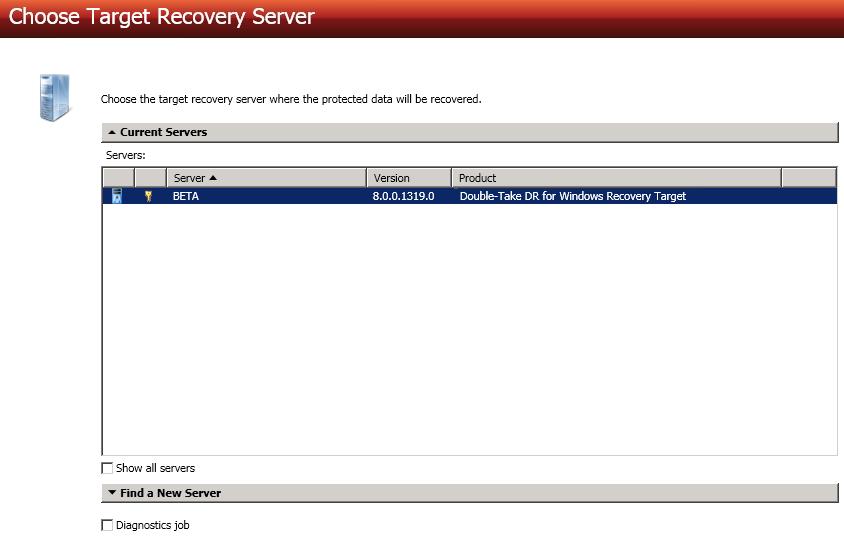
- Current Servers—This list contains the servers currently available in your console session. Select your target server from the list. Servers that are not licensed for the workflow you have selected and those not applicable to the workload type you have selected will be filtered out of the list.
- Find a New Server—If the server you need is not in the Current Servers list, click the Find a New Server heading. From here, you can specify a server along with credentials for logging in to the server. If necessary, you can click Browse to select a server from a network drill-down list.
If you enter the target server's fully-qualified domain name, the Double-Take Console will resolve the entry to the server short name. If that short name resides in two different domains, this could result in name resolution issues. In this case, enter the IP address of the server.
When specifying credentials for a new server, specify a user that is a member of the local Double-Take Admin and local administrator security groups.
You may be prompted for a route from the target to the source. This route, and a port if you are using a non-default port, is used so the target can communicate with the source to build job options. This dialog box will be displayed, only if needed.
You have many options available for your DR recovery job. Some options are available for both data and full server jobs, while some options are only for one job type or the other. Configure those options that are applicable to your environment and job type.
Click a link below to see the options available for that section of the Set Options page.

For the Job name, specify a unique name for your job.

-
Wait for user to initiate recovery—The recovery process can wait for you to initiate it, allowing you to control when the recovery finishes. When the recovery mirror is complete, the job will wait in the Protecting state for you to manually finish the recovery. Disable this option if you want recovery to finish immediately after the mirror is complete.
-
Shutdown source server—Specify if you want to shut down the source server, if it is still running, before recovery completes. This option prevents identity conflicts on the network in those cases where the source and target are still both running and communicating.
This section is only applicable to full server recovery jobs.
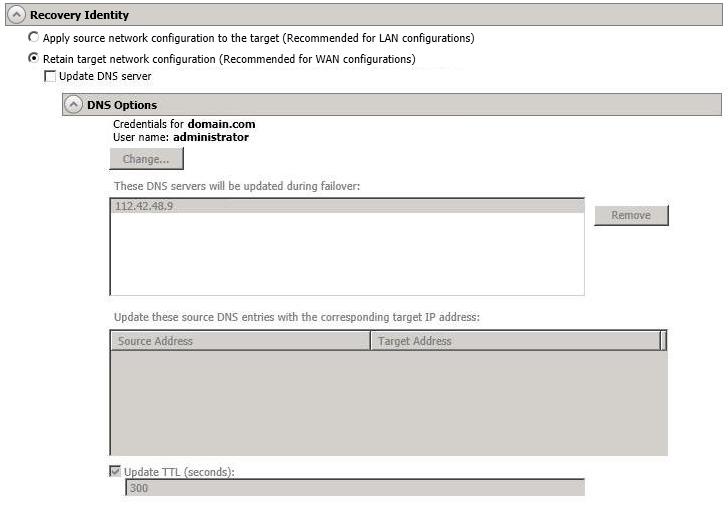
- Apply source network configuration to the target—If you select this option, you can configure the source IP addresses to
Do not apply the source network configuration to the target in a WAN environment unless you have a VPN infrastructure so that the source and target can be on the same subnet, in which case IP address
- Retain target network configuration—
Update DNS server—Specify if you want Double-Take to update your DNS server on
DNS updates are not available for Server Core servers or source servers that are in a workgroup.
Make sure port 53 is open for DNS protocol from the recovery server to the DNS servers so the recovery server can discover the source DNS records.
If you are updating DNS but your source and target are in a workgroup, the DNS suffix must be specified for the source NICs and that suffix must correspond to the zone name on the DNS server.
Expand the DNS Options section to configure how the updates will be made. The DNS information will be discovered and displayed. If your servers are in a workgroup, you must provide the DNS credentials before the DNS information can be discovered and displayed.
- Change—If necessary, click this button and specify a user that has privileges to access and modify DNS records. The account must be a member of the DnsAdmins group for the domain, and must have full control permissions on the source's A (host) and PTR (reverse lookup) records. These permissions are not included by default in the DnsAdmins group.
- Remove—If there are any DNS servers in the list that you do not want to update, highlight them and click Remove.
- Update these source DNS entries with the corresponding target IP address—For each IP address on the source, specify what address you want DNS to use after failover.
- Update TTL—Specify the length of time, in seconds, for the time to live value for all modified DNS A records. Ideally, you should specify 300 seconds (5 minutes) or less.
DNS updates will be disabled if the target server cannot communicate with both the source and target DNS servers
This section is only applicable to full server recovery jobs.
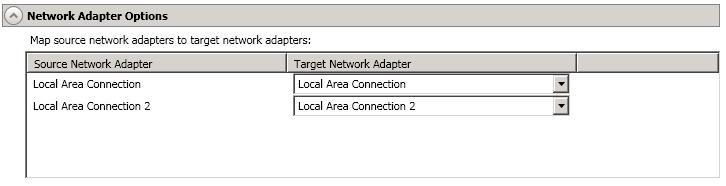
For Map source network adapters to target network adapters, specify how you want the IP addresses associated with each NIC on the source to be mapped to a NIC on the target. Do not mix public and private networks.
-
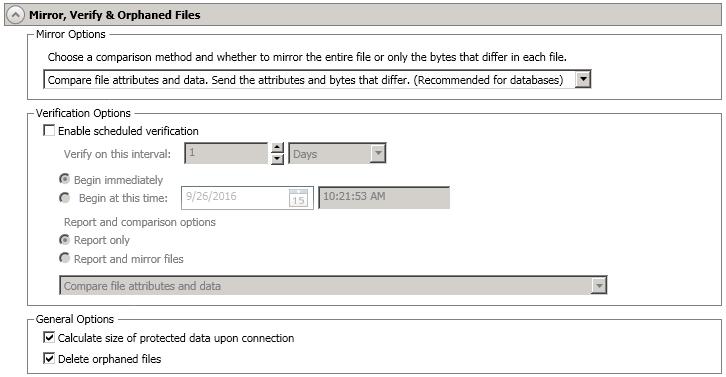
Mirror Options—Choose a comparison method and whether to mirror the entire file or only the bytes that differ in each file.
If you are using a data recovery job and were using a database application on the original source or were protecting a domain controller, do not use the compare file attributes only options unless you know for certain that you need it. With database applications and because domain controllers store their data in a database, it is critical that all files, not just some of the files, are mirrored. In this case, you should compare both the attributes and the data.
- Do not compare files. Send the entire file.—Double-Take will not perform any comparisons between the files on the source and target. All files will be mirrored to the target, sending the entire file. This is equivalent to selecting the mirror all files option prior to Double-Take version 7.1.
- Compare file attributes. Send the entire file.—Double-Take will compare file attributes and will mirror those files that have different attributes, sending the entire file. This is similar to selecting the mirror different files and the only if source is newer options prior to Double-Take version 7.1.
- Compare file attributes. Send the attributes and bytes that differ.—Double-Take will compare file attributes and will mirror only the attributes and bytes that are different. This is equivalent to selecting the mirror different files, only if source is newer, and use block checksum options prior to Double-Take version 7.1.
- Compare file attributes and data. Send the attributes and bytes that differ.—Double-Take will compare file attributes and the file data and will mirror only the attributes and bytes that are different. This is equivalent to selecting the mirror different files and use block checksum options prior to Double-Take version 7.1. If you are using a database application on your source, select this option.
-
Verification Options—Choose if you want to periodically confirm that the source replica data on the target is identical to the actual data on the source. Verification creates a log file detailing what was verified as well as which files are not synchronized. If the data is not the same, you can automatically initiate a remirror, if configured. The remirror ensures data integrity between the source and target.
Because of the way the Windows Cache Manager handles memory, machines that are doing minimal or light processing may have file operations that remain in the cache until additional operations flush them out. This may make Double-Take files on the target appear as if they are not synchronized. When the Windows Cache Manager releases the operations in the cache on the source and target, the files will be updated on the target.
- Enable scheduled verification—When this option is enabled, Double-Take will verify the source replica data on the target.
- Verify on this interval—Specify the interval between verification processes.
- Begin immediately—Select this option if you want to start the verification schedule immediately after the job is established.
- Begin at this time—Select this option if you want to start the verification schedule at the specified date and time.
-
Report only—Select this option if you only want to generate a verification report. With this option, no data that is found to be different will be mirrored to the target. Choose how you want the verification to compare the files.
-
Report and mirror files—Select this option if you want to generate a verification report and mirror data that is different to the target. Select the comparison method and type of mirroring you want to use. See the previous mirroring methods described under Mirror Options.
If you are using SQL to create snapshots of a SQL database, the verification report will report the file size of the snapshot files on the source and target as different. This is a reporting issue only. The snapshot file is mirrored and replicated completely to the target.
If you are using HP StorageWorks File Migration Agent, migrated files will incorrectly report modified time stamp differences in the verification report. This is a reporting issue only.
-
General Options—Choose your general mirroring options.
-
Calculate size of protected data upon connection—Specify if you want Double-Take to determine the mirroring percentage calculation based on the amount of data being protected. If you enable this option, the calculation will begin when mirroring begins. For the initial mirror, the percentage will display after the calculation is complete, adjusting to the amount of the mirror that has completed during the time it took to complete the calculation. Subsequent mirrors will initially use the last calculated size and display an approximate percentage. Once the calculation is complete, the percentage will automatically adjust down or up to indicate the amount that has been completed. Disabling calculation will result in the mirror status not showing the percentage complete or the number of bytes remaining to be mirrored.
The calculated amount of protected data may be slightly off if your data set contains compressed or sparse files.
-
Delete orphaned files—An orphaned file is a file that exists in the replica data on the target, but does not exist in the protected data on the source. This option specifies if orphaned files should be deleted on the target.
Orphaned file configuration is a per target configuration. All jobs to the same target will have the same orphaned file configuration.
If delete orphaned files is enabled, carefully review any replication rules that use wildcard definitions. If you have specified wildcards to be excluded from protection, files matching those wildcards will also be excluded from orphaned file processing and will not be deleted from the target. However, if you have specified wildcards to be included in your protection, those files that fall outside the wildcard inclusion rule will be considered orphaned files and will be deleted from the target.
The orphaned file feature does not delete alternate data streams. To do this, use a full mirror, which will delete the additional streams when the file is re-created.
If you want to move orphaned files rather than delete them, you can configure this option along with the move deleted files feature to move your orphaned files to the specified deleted files directory. See Target server properties for more information.
During a mirror, orphaned file processing success messages will be logged to a separate orphaned file log on the source. This keeps the Double-Take log from being overrun with orphaned file success processing messages. Orphaned files processing statistics and any errors in orphaned file processing will still be logged to the Double-Take log, and during difference mirrors, verifications, and restorations, all orphaned file processing messages are logged to the Double-Take log. The orphaned file log is located in the Logging folder specified for the source. See Log file properties for details on the location of that folder. The orphaned log file is appended to during each orphaned file processing during a mirror, and the log file will be a maximum of 50 MB.
-

This section is only applicable for data recovery jobs.
By default, Double-Take will select a target route for transmissions. If desired, specify an alternate route on the target that the data will be transmitted through. This allows you to select a different route for Double-Take traffic. For example, you can separate regular network traffic and Double-Take traffic on a machine with multiple IP addresses. You can also select or manually enter a public IP address (which is the public IP address of the server's router) if you are using a NAT environment. If you enter a public IP addresses, you will see additional fields allowing you to disable the default communication ports and specify other port numbers to use, allowing the target to communicate through a router.
If you change the IP address on the target which is used for the target route, you will be unable to edit the job. If you need to make any modifications to the job, it will have to be deleted and re-created.
This section is only applicable to data recovery jobs.
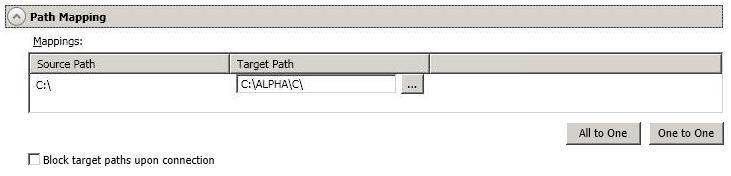
- Mappings—Specify the location on the recovery server where the source data will be restored. By default, the data will be restored in the same directory structure as the original source, in a one to one configuration.
- All To One—Click this button to set the mapping so that the replica source data will be stored on a single volume on the target. The pre-defined path is \source_name\volume_name. If you are protecting multiple volumes on the source, each volume would be stored on the same volume on the target. For example, C:\data and D:\files for the source Alpha would be stored in D:\alpha\C and D:\alpha\D, respectively.
- One To One—Click this button to set the mapping so that the replica source data will be stored in the same directory structure on the target. For example, C:\data and D:\files on the source will be stored in C:\data and D:\files, respectively, on the target.
- Custom Location—If the pre-defined options do not store the data in a location that is appropriate for your network operations, you can specify your own custom location where the replica source data will be stored. Click the Target Path and edit it, selecting the appropriate location.
- Block target paths upon connection—You can block writing to the recovery data on the target. This keeps the data from being changed outside of Double-Take processing.
If you are protecting system state data (like your Program Files or Documents and Settings directory), you must select the All to One mapping or specify a customized location in order to avoid sharing violations.
If you are protecting dynamic volumes or mount points, your location on the target must be able to accommodate the amount of data that may be stored on the source.
If you are protecting multiple mount points, your directory mapping must not create a cycle or loop. For example, if you have the C: volume mounted at D:\C and the D: volume mounted at C:\D, this is a circular configuration. If you establish a job for either C:\D or D:\C, there will be a circular configuration and Double-Take mirroring will never complete.
If you are protecting sparse files, the amount of disk space available must be equal to or greater than the entire size of the sparse file. If the target location is an NTFS 5 volume, the amount of disk space available must be equal to or greater than the on-disk size of the sparse file.

To help reduce the amount of bandwidth needed to transmit Double-Take data, compression allows you to compress data prior to transmitting it across the network. In a WAN environment this provides optimal use of your network resources. If compression is enabled, the data is compressed before it is transmitted from the source. When the target receives the compressed data, it decompresses it and then writes it to disk. You can set the level from Minimum to Maximum to suit your needs.
Keep in mind that the process of compressing data impacts processor usage on the source. If you notice an impact on performance while compression is enabled in your environment, either adjust to a lower level of compression, or leave compression disabled. Use the following guidelines to determine whether you should enable compression.
- If data is being queued on the source at any time, consider enabling compression.
- If the server CPU utilization is averaging over 85%, be cautious about enabling compression.
- The higher the level of compression, the higher the CPU utilization will be.
- Do not enable compression if most of the data is inherently compressed. Many image (.jpg, .gif) and media (.wmv, .mp3, .mpg) files, for example, are already compressed. Some images files, such as .bmp and .tif, are decompressed, so enabling compression would be beneficial for those types.
- Compression may improve performance even in high-bandwidth environments.
- Do not enable compression in conjunction with a WAN Accelerator. Use one or the other to compress Double-Take data.
All jobs from a single source connected to the same IP address on a target will share the same compression configuration.
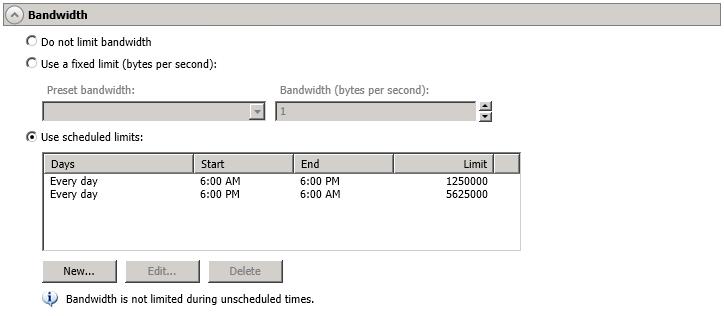
Bandwidth limitations are available to restrict the amount of network bandwidth used for Double-Take data transmissions. When a bandwidth limit is specified, Double-Take never exceeds that allotted amount. The bandwidth not in use by Double-Take is available for all other network traffic.
All jobs from a single source connected to the same IP address on a target will share the same bandwidth configuration.
- Do not limit bandwidth—Double-Take will transmit data using 100% bandwidth availability.
- Use a fixed limit—Double-Take will transmit data using a limited, fixed bandwidth. Select a Preset bandwidth limit rate from the common bandwidth limit values. The Bandwidth field will automatically update to the bytes per second value for your selected bandwidth. This is the maximum amount of data that will be transmitted per second. If desired, modify the bandwidth using a bytes per second value. The minimum limit should be 3500 bytes per second.
- Use scheduled limits—Double-Take will transmit data using a dynamic bandwidth based on the schedule you configure. Bandwidth will not be limited during unscheduled times.
- New—Click New to create a new scheduled bandwidth limit. Specify the following information.
- Daytime entry—Select this option if the start and end times of the bandwidth window occur in the same day (between 12:01 AM and midnight). The start time must occur before the end time.
- Overnight entry—Select this option if the bandwidth window begins on one day and continues past midnight into the next day. The start time must be later than the end time, for example 6 PM to 6 AM.
- Day—Enter the day on which the bandwidth limiting should occur. You can pick a specific day of the week, Weekdays to have the limiting occur Monday through Friday, Weekends to have the limiting occur Saturday and Sunday, or Every day to have the limiting repeat on all days of the week.
- Start time—Enter the time to begin bandwidth limiting.
- End time—Enter the time to end bandwidth limiting.
- Preset bandwidth—Select a bandwidth limit rate from the common bandwidth limit values. The Bandwidth field will automatically update to the bytes per second value for your select bandwidth.
- Bandwidth—If desired, modify the bandwidth using a bytes per second value. The minimum limit should be 3500 bytes per second.
- Edit—Click Edit to modify an existing scheduled bandwidth limit.
- Delete—Click Delete to remove a scheduled bandwidth limit.
If you change your job option from Use scheduled limits to Do not limit bandwidth or Use a fixed limit, any schedule that you created will be preserved. That schedule will be reused if you change your job option back to Use scheduled limits.
You can manually override a schedule after a job is established by selecting Other Job Options, Set Bandwidth. If you select No bandwidth limit or Fixed bandwidth limit, that manual override will be used until you go back to your schedule by selecting Other Job Options, Set Bandwidth, Scheduled bandwidth limit. For example, if your job is configured to use a daytime limit, you would be limited during the day, but not at night. But if you override that, your override setting will continue both day and night, until you go back to your schedule. See the Managing and controlling jobs section for your job type for more information on the Other Job Options.
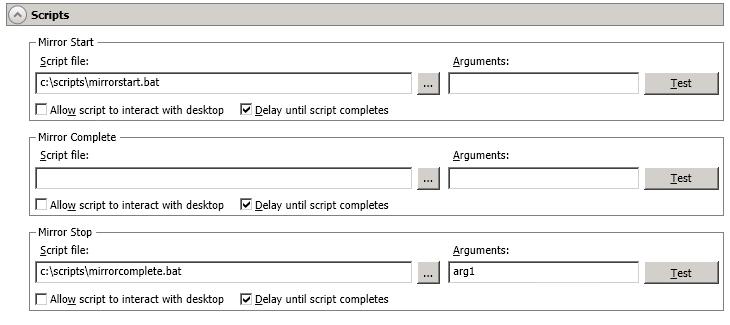
You can customize mirroring by running scripts on the target at pre-defined points in the mirroring process. Scripts may contain any valid Windows command,
executable, or batch file. The scripts are processed using the same account running the Double-Take service, unless you have identified a specific account through the server's properties.
- Mirror Start—This script starts when the target receives the first mirror operation. In the case of a difference mirror, this may be a long time after the mirror is started because the script does not start until the first different data is received on the target. If the data is synchronized and a difference mirror finds nothing to mirror, the script will not be executed. Specify the full path and name of the Script file.
- Mirror Complete—This script starts when a mirror is completed. Because the mirror statistics may indicate a mirror is at 99-100% when it is actually still processing (for example, if files were added after the job size was calculated, if there are alternate data streams, and so on), the script will not start until all of the mirror data has been completely processed on the target. Specify the full path and name of the Script file.
- Mirror Stop—This script starts when a mirror is stopped, which may be caused by an auto-disconnect occurring while a mirror is running, the service is shutdown while a mirror is running, or if you stop a mirror manually. Specify the full path and name of the Script file.
- Arguments—Specify a comma-separated list of valid arguments required to execute the script.
- Allow script to interact with desktop—Enable this option if you want the script processing to be displayed on the screen. Otherwise, the script will execute silently in the background. If you enable this option, the account running the script must have permission to interact with the desktop.
- Delay until script completes—Enable this option if you want to delay the mirroring process until the associated script has completed. If you select this option, make sure your script handles errors, otherwise the mirroring process may never complete if the process is waiting on a script that cannot complete.
- Test—You can test your script manually by clicking Test. Your script will be executed if you test it. If necessary, manually undo any changes that you do not want on your target after testing the script.
If you establish mirroring scripts for one job and then establish additional jobs to the same target using the same target path mapping, the mirroring scripts will automatically be applied to those subsequent jobs. If you select a different target path mapping, the mirroring scripts will have to be reconfigured for the new job(s).
Double-Take validates that your source and target are compatible. The Summary page displays your options and validation items.
Errors are designated by a white X inside a red circle. Warnings are designated by a black exclamation point (!) inside a yellow triangle. A successful validation is designated by a white checkmark inside a green circle. You can sort the list by the icon to see errors, warnings, or successful validations together. Click on any of the validation items to see details. You must correct any errors before you can continue.
If you receive a path transformation error during job validation indicating a volume does not exist on the target server, even though there is no corresponding data being protected on the source, you will need to manually modify your replication rules. Go back to the Choose Data page and under the Replication Rules, locate the volume from the error message. Remove any rules associated with that volume. Complete the rest of the workflow and the validation should pass.
Once your servers have passed validation and you are ready to establish recovery, click Finish, and you will automatically be taken to the Jobs page.
Jobs in a NAT environment may take longer to start.
- Apply data in target queues before recovery—All of the data in the target queue will be applied before recovery finishes. The advantage to this option is that all of the data that the target has received will be applied before recovery completes. The disadvantage to this option is depending on the amount of data in queue, the amount of time to apply all of the data could be lengthy.
- Discard data in the target queues and recover immediately—All of the data in the target queue will be discarded and recovery will be completed immediately. The advantage to this option is that recover will complete immediately. The disadvantage is that any data in the target queue will be lost.