

|
The following evaluation procedure has eleven tasks containing step-by-step instructions for evaluating the core functionality of Double-Take Availability, specifically mirroring, replication, failover, and restoration. This is a good process for users who want to see, first-hand, the benefits that Double-Take Availability has to offer.
Before starting this evaluation procedure, make sure you have Double-Take Availability installed on the source and target. You should have at least 1 GB of data on the source for testing. If you are going to be protecting application data, make sure the application is pre-installed on the target, but the application is not running on the target. If the application is running on the target, the files will be held open and Double-Take Availability will not be able to write to the files. In the even of a source failure, the application can be started on the target and the files can then be accessed.
This evaluation consists of the following tasks.
Click Make a connection from the right pane of the Replication Console. If that quick launch screen is no longer visible, select Tools, Connection Wizard.
If the Double-Take Servers root is highlighted in the left pane of the Replication Console, the Connection Wizard menu option will not be available. To access the menu, expand the server tree in the left pane, and highlight a server in the tree.
The Connection Wizard opens to the Welcome screen. Review this screen and click Next to continue.
At any time while using the Connection Wizard, click Back to return to previous screens and review your selections.
If you highlighted a source in the Replication Console, the source will already be selected. If it is not, select the Double-Take Availability source. This is the server that you want to protect. Click Next to continue.
Double-Take Availability will automatically attempt to log on to the selected source using previously cached credentials. If the logon is not successful, the Logon dialog box will appear prompting for your security identification.
If you highlighted a target in the Replication Console, the target will already be selected. If it is not, select the Double-Take Availability target. This is your backup server that will protect the source. Click Next to continue.
Double-Take Availability will automatically attempt to log on to the selected targetusing previously cached credentials. If the logon is not successful, the Logon dialog box will appear prompting for your security identification.
View your new connection in the Replication Console by highlighting the source on the left pane. The connection will appear on the right pane. Use the horizontal scroll bar at the bottom of the right pane to view the various status columns. Pay attention to the Mirror Status column which shows the status of the mirroring operation. During the mirroring process, you will see a percentage of the mirror that has been completed. When the Mirror Status changes to Idle, there is no mirroring activity, meaning your initial mirror has completed.
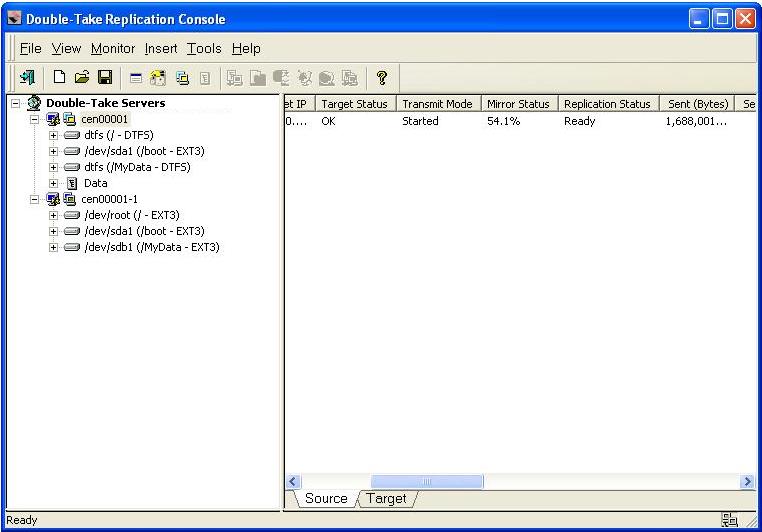
To view specific mirroring statistics that may be of interest, use the horizontal scroll bar at the bottom of the right pane of the Replication Console window to view the various columns.
Monitoring a connection through the Replication Console contains complete details on all of the Replication Console statistics.
After your mirror is complete, look at your target and you will see the replicated data stored in the location you specified. Now you are ready to continue with the evaluation.
In order to test replication, you need to change the data on your source. This includes modifying existing files, creating new files, deleting files, and changing permissions and attributes.
Monitoring a connection through the Replication Console contains complete details on all of the Replication Console statistics.
Many user applications typically save an entire file even though only a portion of the file may have changed. Therefore, the replication statistics will show the entire file being transmitted, not just the changed data. To confirm that replication only transmits the changed segments of files, you must use an application, such as a database application, or a command, such as the echo command, to save only the changed portions of a file.
You may notice your Replication Status toggle between Replicating and Ready as it continues processing the file changes, when your Replication Status stays at Ready, Double-Take Availability is waiting for additional changes to transmit. After replication is complete, you are ready to continue with the evaluation.
Now that you have modified some of the files, you want to be sure that the file modifications were applied correctly.
Machines that are doing minimal or light processing, as you are in this evaluation, may have file operations that remain in memory until additional operations flush them out and they are written to disk. This may make Double-Take Availability files on the target appear as if they are not synchronized. When the operations in memory are released, the files will be updated on the target. To make sure this does not impact your testing, flush memory by copying a couple of files from one directory to another and then deleting them. You can also use the sync program (which exercises the sync(2) system call) to flush memory.
Select Verify only and click OK.
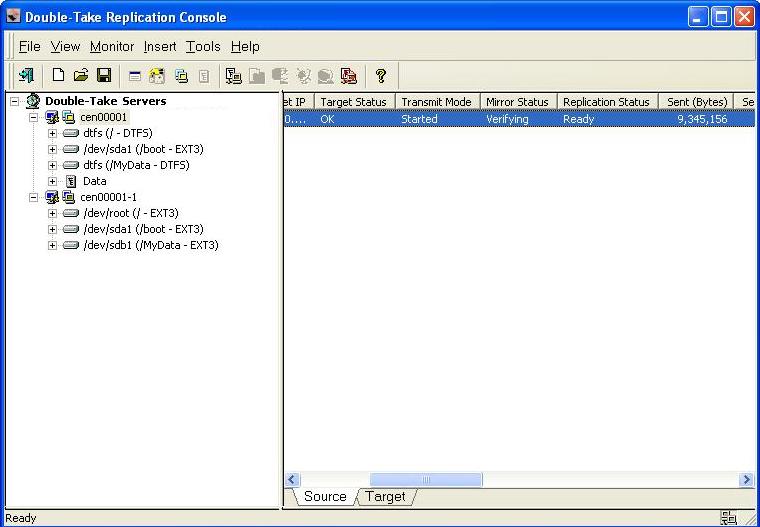
Just like when you were monitoring the mirror and replication processes, you can monitor the verification process. Notice that the Mirror Status column changes to Verifying while the verification process occurs. When the verification is complete, Double-Take Availability will have created a log file for you to review.
Modify one of your files on the target and repeat the verification process, but this time, select Remirror data to the target automatically.
Since your target file is newer, make sure that Only if the source’s date is newer than the target’s date is not selected.
At this point in your evaluation, you may want to test your target data. The type of testing you will need to perform will depend on the type of data you are protecting.
When the mirror is complete, your source and target will again be synchronized and you can continue with your evaluation.
The following instructions will configure failover monitoring.
Select the source to be monitored by marking the check box to the left of the source server name in the Names to Monitor tree.
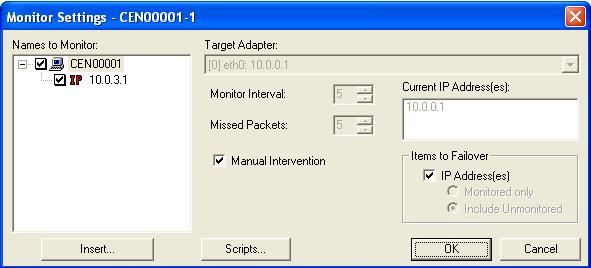
At this point, in terms of your evaluation, your failover configuration is complete because you will be using the default settings for the remaining options. But while you are viewing the Monitor Settings dialog box, notice the configuration options available to you.
Since it can be essential to quickly know the status of failover, Double-Take Availability offers various methods for monitoring the state of failover. When the Failover Control Center is running, you will see four visual indicators.
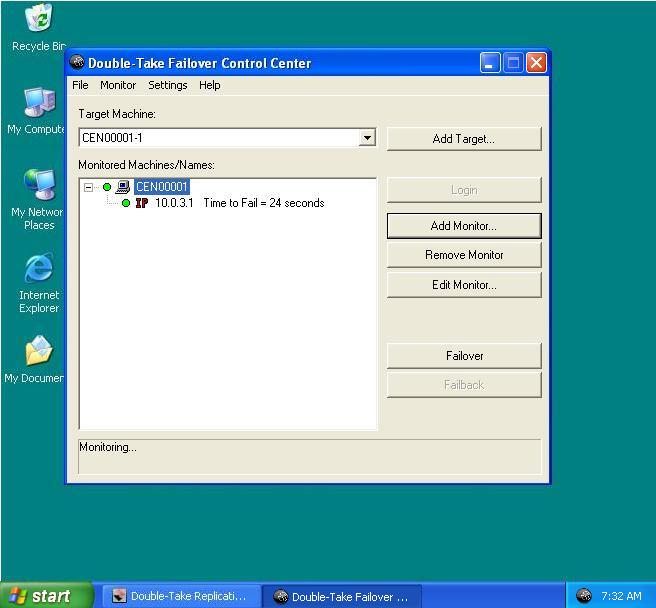
You can minimize the Failover Control Center and, although it will not appear in your Windows taskbar, it will still be active and the failover icon will still appear in the desktop icon tray.
The Failover Control Center does not have to be running for failover to occur.
Monitoring failover contains more information on the Failover Control Center visual indicators.
To fully evaluate failover, you need to simulate a failure. The Failover Control Center does not have to be running in order for failover to occur, but for the purpose of this evaluation, make sure that it is running so that you can see each step of the process.
Disconnect the network cable(s) on the source. Notice immediately, that the Failover Control Center Time to Fail counter decreases and never resets. You will see the icons change to yellow and eventually to red. Once the icons are red and the Failed Over message is displayed, failover has occurred.
The Linux system log on the target provides details on the actual steps that have occurred during failover.
As you can see, the target has taken on the identity of the source. Application and user requests destined for the source are routed directly to the target. The impact on your end users is minimal.
While your source is failed over to your target, end users continue to work without interruption and the data on the target will be updated. To fully evaluate the next step, restoration, simulate the changes that the end users would have made on the target while the source was unavailable.
If desired, you can also test the target data as you did earlier. You can test user data using the associated application, and you can save the changes if desired. If you want to test application data, start the application services on the target, and test the application data by using clients to connect to the application. Because the source is now failed over, you will not need to worry about pausing the target or configuring clients to access the application from the target. The clients will continue to access the source, which is now being handled by the target machine.
When failover occurs, a source machine has failed. The steps below must be used to complete failback, which releases the source identity from the target. .
Next you would resolve the source machine problem that caused the failure.
Do not connect the source machine to the network at this time.
Select the failed source and click Failback.
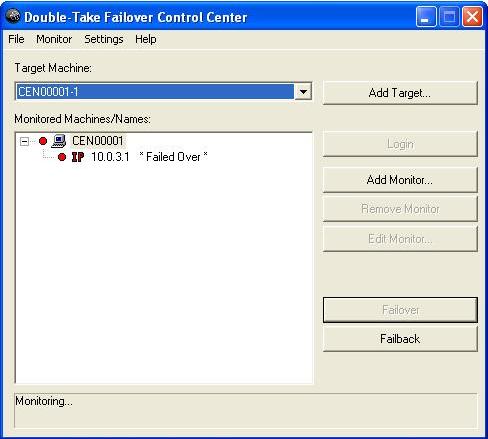
At this time, your target is back to its original identity and the source is back online.
The Replication Console provides an easy method for restoring replicated data from the target back to the original source or to a new source server. You are only required to input the original source, the target, and the name of the replication set you want to restore. Double-Take Availability handles the rest, including selecting the files in the replication set and restoring them to the correct location.
From the Replication Console, select Tools, Restoration Manager.
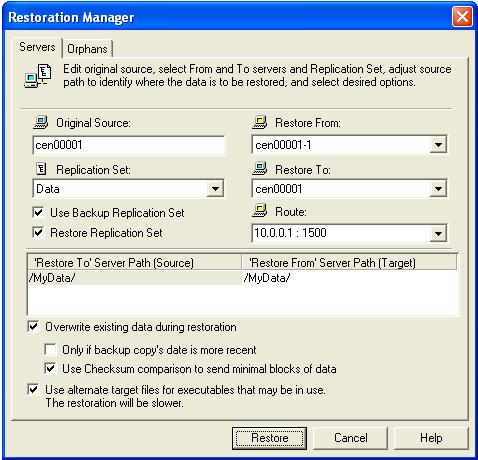
Once the restoration is complete, your evaluation is complete. Congratulations!
 Establishing a connection