You are here: Failback and restoration > Restoring then failing back

Restoring then failing back

Use these instructions to restore your data first and then failback.

  1. Resolve the problem(s) on the source that caused it to fail. If you have to rebuild your source, use a unique identity.
  2. Stop any applications that were failed over that may be running on your source. The files must be closed on the source so that updated files from the target will successfully overwrite the files on the source during the restoration.
  3. Modify the source so that it can be brought onto the network with a new, unique IP address or one that was not failed over. It needs to be able to exist on the network without an IP address conflict and communicate with the target.
  4. At this point, confirm you have the following configuration.
  5. From your target, confirm the Replication Console is communicating with the source using the new, unique IP address.
    1. From the Replication Console on the target, right-click the source and select Remove.
    2. Depending on your configuration, the source may be automatically inserted back into the Replication Console. If it is not, select Insert, Server. Specify the source server by the new IP address and click OK.
  6. Disconnect the connection from the original source to the target, if it still exists.
  7. Begin your restoration process.
    1. From the Replication Console, select Tools, Restoration Wizard.
    2. Review the Welcome screen and click Next to continue.

      At any time while using the Restoration Wizard, click Back to return to previous screens and review your selections.


    3. Select the target that contains the current copy of the data that you want to restore and click Next.
    4. Select the original source or Alternate, if your original source is not listed. This option identifies to the target which data set you are trying to restore so that the appropriate replication sets can be presented to you.
    5. Click Next to continue.
    6. Specify if you want to use an existing replication set or create a new one. This replication set will be used to connect from the target to the source.
    7. Click Next to continue.
    8. A tree display appears identifying the data available for restoration. Mark the check box of the volumes, directories, and/or files you want to restore. Keep in mind that if you exclude volumes, folders, and/or files that were originally replicated, it may compromise the integrity of your applications or data.
    9. Click Next to continue
    10. Select the new source server. This is the server where the data from the target will be restored. This may be the original source server or a new server. Click Next to continue.
    11. Select your network route to the new source, which includes the IP address and port number. Also select the location on the new source for the restored data. If you want to set a customized path, click in the field under Source Path to edit the location.

    12. Click Next to continue.
    13. Specify the restoration options that you want to use.
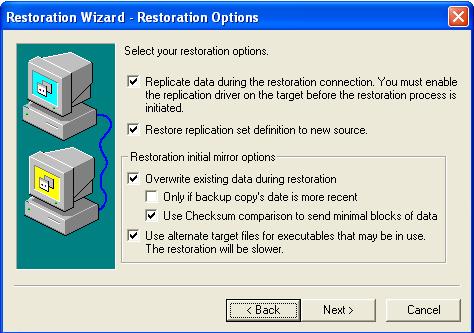
    14. Review your selections and click Finish to begin the restoration.
  8. Monitoring the restoration connection and after the Mirror Status is Idle, schedule a time for failback. User downtime will begin once failback is started, so select a time that will have minimal disruption on your users.
  9. When you are ready, begin the failback process.
    1. Stop user access to the target.
    2. In the Replication Console, watch the restoration connection until activity has ended and replication is in a Ready state. This will happen as the final data in queue, if any, is applied on the source. The replication Ready state indicates replication is waiting for new incoming data changes.
    3. Disconnect the restoration connection.
    4. Open the Failover Control Center.
    5. Select the original target that is currently standing in for the original failed source.
    6. Highlight the failed source and click Failback. The user downtime starts now. If you have a pre-failback script configured, it will be started.
    7. When failback is complete, the post-failback script, if configured, will be started. When the script is complete, you will be prompted to determine if you want to continue failover monitoring, do not select either option. Leave the prompt dialog box open as is.
  10. On the source, modify the identity back to the original source IP address.
  11. Confirm the Replication Console is communicating with the source using the original IP address.
    1. Right-click the source and select Remove.
    2. Depending on your configuration, the source may be automatically inserted back into the Replication Console. If it is not, select Insert, Server. Specify the source server by the original IP address and click OK.
  12. At this time, you can go back to the dialog box in the Failover Control Center. Select Continue or Stop to indicate if you want to continue monitoring the source. After you have selected whether or not to continue monitoring the source, the source post-failback script, if configured, will be started.

    The source must be online and Double-Take Availability must be running to ensure that the source post-failback script can be started. If the source has not completed its boot process, the command to start the script may be lost and the script will not be initiated.


At this time, you can start any applications and allow end-users to access the data.