You are here: Failback and restoration > Failing back then restoring

Failing back then restoring

Use these instructions to failback first and then restore your data.

  1. Resolve the problem(s) on the source that caused it to fail. If you have to rebuild your source, make sure you use the same identity as the original source configuration.
  2. Because you do not want your users accessing the source or its data until newer data from the target can be restored, deny access to user logins by setting /etc/nologin. See your Linux documentation for details on creating this file.
  3. Stop any applications that may be running on your source. The files must be closed on the source so that updated files from the target will overwrite the files on the source during the restoration.
  4. From the Failover Control Center, select the target that is currently standing in for the failed source.
  5. Select the failed source and click Failback. The user downtime starts now. If you have a pre-failback script configured, it will be started.
  6. When failback is complete, the post-failback script, if configured, will be started. When the script is complete, you will be prompted to determine if you want to continue monitoring the source. Select Continue or Stop to indicate if you want to continue monitoring the source. After you have selected whether or not to continue monitoring the source machine, the source post-failback script, if configured, will be started.

    The source must be online and Double-Take Availability must be running to ensure that the source post-failback script can be started. If the source has not completed its boot process, the command to start the script may be lost and the script will not be initiated.


  7. From the Replication Console, select Tools, Restoration Manager.
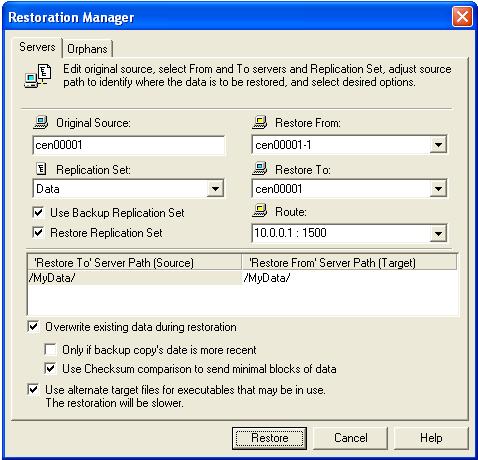
  8. Identify the Original Source machine. This is your source machine where the data originally resided.
  9. Select the Restore From machine. This is the target machine where the copy of the data is stored.
  10. Replication Set contains the replication set information stored on the target machine (the machine in Restore From). If no replication sets are available, the list will be blank. Select the replication set that corresponds to the data that you need to restore.
  11. Select the Restore To machine. This is your source where the updated data from the target will be sent.
  12. Select the Use Backup Replication Set check box to use the target’s copy of the replication set database for the restoration. If this check box is not marked, you will be accessing the replication set information from the source.
  13. Select the Restore Replication Set check box to restore the target’s copy of the replication set database to the source during the restoration process.
  14. Select the Route on the target. This is the IP address and port on the target that the data will be transmitted through. This allows you to select a different route for Double-Take Availability traffic. For example, you can separate regular network traffic and Double-Take Availability traffic on a machine with multiple IP addresses.
  15. The Restore To Server Path and Restore From Server Path paths will automatically be populated when the replication set is selected. The restore to path is the directory that is the common parent directory for all of the directories in the replication set. If the replication set crosses volumes, then there will be a separate path for each volume. The restore from path is the path on the target server where the replicated files are located.

    Restoring across a NAT router requires the ports to be the same as the original connection. If the ports have been modified (manually or reinstalled), you must set the port numbers to the same values as the last valid source/target connection.


  16. Select the restoration conditionals that you want to use.
  17. If you want to configure orphan files, click the Orphans tab. The same orphan options are available for a restoration connection as a standard connection.
  18. Click Restore to begin the restoration.

After the restoration is complete, the restoration connection will automatically be disconnected and the replication set deleted. At this time, you can start any applications and allow end-users to access the data on the source.